Sewing Vloggers

Saturday, August 30, 2008

Those Bishop Sleeves!

The sequence of construction for a child's bishop dress has always intrigued me, not that they are all constructed alike. But my TNT pattern, Creative Needle's Shoulder Button Bishop by Trudy Horne does things in a unique fashion. The front and back of the dress are cut out and put aside. Then a block is cut that will accommodate BOTH sleeves. The shape of each of the two sleeves is then drawn on the block. I use a mechanical pencil for most of my marking. I know, I just heard you shreik! I do not like and v. rarely use any of the disappearing (and returning) markers. Let's just say I have reason not to trust them. I have used mechanical pencils on most of my heirloom clothing, including christening gowns. With a little rubbing and some Biz, the line comes out. Usually I am pretty careful, however, to be as inconspicuous as possible with the pencil, drawing very lightly. I have done this for several years on nearly every thing I have made and it hasn't failed me yet.

The block is now pleated on the sleeve bottom edge with VERY long threads to ready it for smocking. Once this bottom edge is smocked the little puff sleeves will be all gathered and will be elastic, too!

The long threads are now pulled up between the two sleeve drawings and cut. Then the block is cut between the two sleeve drawings. Now you have the bottom of the two sleeves all pleated and separate. The long pleating threads are then spread flat for any trim to be attached.

Once the trim is on, in this case a 3 inch lace, the pleated sleeves will be attached to the back and front of the dress with french seams. Only then can the neckline be pleated and blocked. After that the smocking can finally start and tomorrow should see that task accomplished!

*************************************************
I have had a very very busy week with our work and have really been savoring my sewing time. Talk about return to sanity! I have been mentally pleating this outfit all week and it felt good to get those sleeves done. I put the pressure on myself to do this so I can then start work on my muslin for the grey coat. Then I will be back to my two project mode, one by hand, one by machine. The heat is on!

*************************************************
Today's mail brought me a book I have been craving for some time, " Sewing with Whimsy" by Kari Mecca. I will have a review on it in my next post. Til then..............Bunny
Sunday, August 24, 2008

Print Seduction

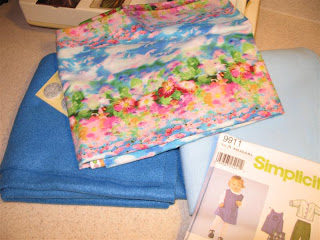
Once again the power of the print sucked me in. On the way home from work Friday night, errands found me driving thru our local Native American reservation. There is a wonderful quilt shop there, "Dreamquilter" , and I decided to stop in. It had been a long while since my previous visit. There were some breathtaking prints, particularly in the flannels. It was way too hot out to think flannel so I kept looking. Then this Matisse type print said, "Hello!" and we decided to become friends. The print is very Matisse but the colors are lighter and brighter. It would definitely look darling on Miss Carly. Behind it you see a couple of pieces of blue acrylic felt that could work as a base for a felted little jacket. The jacket is a Simplicity and very basic. Lots of opportunity for creativity here. If and when I get to this one, it will be in a size for next spring/summer. That's the tough part about sewing for children...........predicting future size. Sometimes its a real shot in the dark.

My felter is feeling neglected and I really have to spend some time with it. I am duly inspired by the blog Machine Felting Arts and am going to try to work thru the lessons on the blog. I think that will get me moving on felting. Or is it fulling? There was a major to-do on that subject not long ago on one of the major sewing sites. I won't even start on that one! Frankly, it's about the creativity for me, not so much the nomenclature.

*************************************************
Today I finally managed to get down into the studio. Got the christening gown cut out. But before I got to that, I decided to tea dye the lace and fabric. It is a lovely ecru now and I am much happier with the lace/fabric combo. It matches beautifully. With some dusty colored threads I think this will be lovely. Dang, it felt good to sew today, well, cut anyway.
***********************************************
It's that harvest time of year. I don't think there is anything prettier than a freshly picked green pepper. So here is a pic of this morning's harvest.
Lata,..................Bunny

Tuesday, August 19, 2008

My new coat!

Well, I have finally decided on my next project. Above you can see Burda 7855. It is classic and I think it is the one for my charcoal grey cashmere. I like it's princess shoulder seams, all the better for fitting. I also like its classic look. I don't want to use up my cashmere for anything trendy, as tempting as that may be. This coat fits the bill. I am going to do View A, the style you see here, but will cut it short, jacket length. For me, that is about 32-35 inches long. The shoulder princess seams give lots of opportunity for fitting. I will start with a muslin before cutting into the cashmere.

I was really hoping for a coat that would lend itself to a fur collar. Last summer I was at Fabric Fix as the owner unloaded some absolutely fabulous high end faux furs he picked up on his biweekly jaunts to the Garment District. I grabbed the fox and brought it back to NY. I think I will make a detachable fur collar for this coat with the fox. It really is lovely. The longer guard hairs make it look so natural. I have it here kind of draped in a big wrinkle, but you get the idea. I think it will be lovely with the grey cashmere.

I really long to get back to tailoring. While this pattern doesn't allude to any hand tailoring, that is where I want to go. I will do bound buttonholes, possibly welt pockets, and a pad stitched collar and lapels. I need to do some research as I am not sure about the specific measurements for doing my pad stitching on the collar. The lapels are obvious, but the collar I am not so sure about.

Now all I need to hone in on is a hand stitching project. If I get a moment I will cut out the Christening gown for our niece and that should fill the bill nicely. Keep ya' posted.........Bunny

Wednesday, August 13, 2008

A Smocked Outfit for Carly


This outfit was such fun to do. The color and print of the rose fabric just seduced me. And, when I thought of Carly's strawberry blonde hair, I knew this would be perfect for her.

The fabric is a quilting cotton, nothing too fancy. It has an all over rose print. I needed to find a complimentary print for the pants and bindings and this reddish brown subtle print worked really well.

This outfit morphed from a simple little top to a long top/dress and coordinating capris. My inspiration was "Tickled Pink" from AS&E but it has morphed a fair amount from that. The inspiration smocking plate is not evident here. I think I did maybe the first two rows per the plate and the rest came out of my head. No bullions here! I decided instead to do some rat tail bows and I love them.

When it came time to do the piping, I could not find my piping filler that I usually use. How do you lose something like that? Then I remembered an article somewhere suggesting the use of rat tail cord. That I had, so I tried it. I was not happy. It was a tad larger than what I wanted. But the worst part was that the shine of the rat tail shown thru the piping fabric. Never again on that one! Live and learn,,,,,

Since this started out originally as a top only, I found myself short of fabric when it was time to turn it into a dress. Luckily I was able to get more. Now, how do I lengthen the top? I added on the additional length in a couple of different ways. First, I added about 6 inches more length, tucking the seam up into a tuck, actually two tucks. I was pleased with that effort. Then, to make it even a bit longer, I did a band for the hem. I stitched on an additional 2 1/2 inch band, folded it to the back, and hand stitched the band hem on. At this point, I am pleased with it all and will mail this out to dear daughter in the AM. I can't wait to see a pic of Carly with it on.

************************************************

With the completion of this little affair for Carly, I am back to deciding on my next project. I have mentioned before that I rarely do more than one project at a time. So when a project is completed, I am rather bereft. I am still hunting for the right pattern for my charcoal cashmere. That looks like the next big to-do. I still need something for handwork to do and have not quite decided what that will be. I think I will search the web tonight for more pattern options. Just my luck it will be a Marfy............Bunny

Monday, August 11, 2008

Next projects

I have been trying to decide on my next project. Of course that means I needed to go thru all my fabrics, well, maybe not all, but at least all the wools. I found a cashmere that I have had aging nicely for quite some time waiting for the right project. It really is lovely lovely fabric, a charcoal grey with the loveliest hand. It looks wonderful with the silver gray Cotswald curls, so I am trying to work a design that will employ the cashmere, the curls, and some silver metallic free motion embroidery. That's what is gelling at the moment. I am anxious to do some adult design.

*************************************************
I am so close to being done Miss Carly's next smocked outfit. All that is left is the hand sewing on the hem and bindings. It is so cute. As soon as it is done pics will be coming. I did manage to get a little hemming done while working today. So hopefully I will have pics soon.


Wednesday, August 6, 2008

Different Types of Smocking

Smocking, in its various forms, is being seen in a lot of fashion today, not just little girl's dresses. I have seen several stitchers discover smocking and creatively apply it to their clothing. Personally, I am on a quest to employ more English smocking into my own "adult" clothing. It can be such a creative technique and is definitely underserved for us "big people."

Todays post is about this because I think there is some confusion out there about what smocking is, and what types of smocking there are. Hopefully, I can shed a little light on the subject so here goes.

Counterchange Smocking: This was the first smocking I ever attempted, some 4 years ago. Yup, I have been smocking four years. I wish I had attempted it much earlier but seems I needed the inspiration of grandchildren to motivate me.
Counterchange consists of fabric that is either gingham, striped, a tiny repeat, or lovingly hand marked by the stitcher. I say lovingly because it requires that a horde of teeny dots be marked if you are going that route. The dot making is how one goes about doing counterchange smocking on a solid fabric. The corners of the gingham squares, or the stripe edges, or the repeating pattern are picked up with needle and thread in a specific pattern. This can be either a geometric repeating design or something more figurative. The more figurative looks require a "plate" or design to follow. Counterchange goes fast, is easy, and gives great results out of the box. I definitely would recommend it as an introduction to smocking.

Next is Canadian Smocking, aka Lattice Smocking, aka American smocking, aka North American Smocking . Did you or your Mom make pillows for the couch from patterns, Simplicity I think, that were "smocked"? These had large repetitive folds of fabric in lovely patterns that were made by making those dots again, but nowhere near as close. The dots were then stitched on in a pattern and pulled up to make a three dimensional design. Gosh I remember those pillows! Here you can learn how to revive that craft from the sixties, that is if you really want to. ( tongue in cheek.)

On to Italian Smocking, aka Italian shirring: Talented bloggista Birgitte shows an example of Italian smocking on her blog. She references Collette Wolf's tome, "The Art of Fabric Manipulation" and works up her sample in silk chiffon. Moto brave, heh? The way Birgitte and Wolf smock, a pattern is followed by making running stitches on flat fabric which are then pulled up to make this incredible surface texture. The way I've learned to do this was on already pleated fabric, as in pleated on a pleater, and then working the stitches of the pattern thru the pleats. This is how Australian Smocking and Embroidery teaches it also. In this method the holding threads are then pulled out and the pattern is formed. The end result is the same. In both methods you are stitching a pattern of stitches that pull. In Wolf's method, pulling the threads makes the texture. In the method I know releasing the threads makes the marvelous texture. This is like going to the same place with two ways to get there. It is a gorgeous textural technique, either way.

Next is Picture Smocking: Ahhhh, the elusive. The people I know who do this the best are those stitchers that just dove into it, not knowing that they were getting into something difficult. Then there are the rest of us. We know picture smocking is difficult and we keep trying but it just seems to take a long time to master. What's to master? Everything, of course, but mostly how to stack cables. Picture smocking is just what it's name implies, smocked fabric with stitching that is pictorial. It could be little bunnies, boats, flowers, ballerinas, you name it. Just about anything can be turned into picture smocking. It is doggone cute. You won't see it on more traditional clothing for children. This is the fun stuff. You use picture smocking when you want to make your little boy a longall with fire trucks on it. Picture smocking is stitched onto pleated fabric once again but the pictures come from stacked cables. And it is not easy to stack cables. You need to get them smooth to look right and there are all sorts of tricks to do that. I am not that good at it, but I keep trying. Slowly I am getting better, very slowly.

And last but not the least is my favorite and what I really enjoy doing, and that is English Smocking. English smocking is worked on pleated fabric. The fabric can be pleated by hand with the aid of something called Knotts Dots or it can be pleated in a pleater, as I have often shown on this blog. Once the fabric is pleated stitches are applied, gathering up tiny parts of the pleats in a pattern that makes a geometric design. I just love this type of stitchery. It is repetitive but not too much so. It makes a great texture, and it gives the opportunity for some great color interaction between the stitches and the fabric. If you click on any of the smocked garments in the Pattern Review widget on the right there will be closeups of geometric English smocking in the reviews. The archives here are full of them also.


I hope you have enjoyed this broad overview of smocking and what it is and isn't. There are subdivisions of these types as well, but these terms and styles are what most stitchers are familiar with. ..............Bunny

Monday, August 4, 2008

The A to Z of It


Yesterday was our Bicentennial Celebration in our hamlet up here in the Adirondack foothills. My table was all set with fabrics, books, magazines, etc... I wanted to show how to use a pleater. The night before I quickly grabbed a width of fabric that I have been planning on using for a sundress for DGD. It had stripes and I figured that would be a good way to show grain while pleating. It worked out well and luckily pleated beautifully. You just never know. I even let people turn the cranks, of course after great instruction! LOL! The rose outfit also got it's smocking completed. So all in all it was a very productive afternoon and great fun too. As soon as Blogger lets me, I will post pics. Next to the pleated fabric is my inspiration, a sundress from an older Sew Beautiful magazine.

Now for today's post's title-. The A-Z series of sewing books is just fabulous. These are the four I own and love. The photography and text are of the same high quality as other Country Bumpkin publications.
This all comes to mind as these were a couple of the books that I brought with me to the demonstration. With the bullions being used by Chado Ralph Rucci in his new Vogue patterns, perhaps A-Z of Bullions should be in every serious sewist's library. I know, I know. How can you have an entire book on bullions? Easy. There are tapered bullions, Susan O'Connor bullions, bullion bears, bullion roses, bullion fruit, bullion loops, ad infinitum. I would be lost without this bullion book. Before the book, bullions were difficult and left a lot to be desired. After the book, they are easier, look much better, and don't intimidate me any more. So these books are a "highly recommend." Oh, if you check them out on the Country Bumpkin site, remember the prices are Australian. And you were having the vapors, right? I usually get my books within two weeks the most from Australia, but some stores carry them in the US, particularly machine dealers from what I have seen.

Pics coming as soon as Blogger allows.....Bunny

Had to Refurbish This One!

    About  6 or 7 years ago , during the dawn of the Zipper Trend,  I bought one of my rare retail items. It was a blush pink and black bord...