Sewing Vloggers

Thursday, March 31, 2011

Issey Miyake Vogue 2522

Issey Miyake has always been my favorite designer from Vogue patterns. His work is so unique and has an origami quality. In the 90's I purchased every pattern I could of his. Vogue 2522 is my favorite of all and this will be the fourth time I make this shirt. I have been wanting to start making some shirts and since this is one of my faves I decided to start here. You can can see from my notes in the pattern I made this in 1994 in denim chambray, in 1995 in a rayon, and in 1999 in  silk linen blend. The 2011 version will be simple cotton shirting and a quilting cotton, the floral. I am not  wondering if this will look dated and I don't really care. Let's just call it my romp through retro. What I remember most of this shirt is that it was so comfortable and I wore each one to death. Let's check out the pattern a bit. 
Are those pants fun or what? I've never made them but always wanted too. My thighs just won't let me. I can see them really fitting in with the current trouser trend. This vest is a gorgeous example of tailoring and that I would love to make some day. The entire collar section buttons on. Then there is the shirt. It is just big and comfy. What more can you say? I did find the sleeves very short, even for me, and lengthened them and inch and a half! My version will have piping on the shoulder seams and around the neckline and on the cuffs. 
 
Here are the pattern pieces. Looking at the actual pieces the armscyes look too  small to encompass the upper sleeve edge but it worked before without adjustment so it should work again. Piece 16 is the collar. I remember every time I made this getting the final point nice and neat was not the easiest thing, sort of like putting an end on infinity.  Let's see if my skills have improved since the last fling with this one. Not this specific pattern, but his patterns are generally known to be difficult to alter.because of their odd shapes. They have also been compared to jigsaw puzzles. I think it is the challenge of the origami construction that appeals to me, although this particular pattern is fairly traditional. 

My goal here is to make a loose comfy top to throw over a pair of jeans. I know I will wear this to death like the others. 

Oh, if you are thinking of picking up this vintage (1990) pattern on the web, beware. It's not cheap as this link on Etsy will show you. Did you catch your breath yet?....Bunny

Wednesday, March 30, 2011

Organizing Continues....


My Spring cleaning re-org continues. I found yesterday this HUGE pressing cover for my cutting table, 36x72. When I bought the table this mat was real cheap so I got it too. Once I tried it out I decided I did not like it at all and wanted my cutting table set up just for cutting. Putting the mats on top of this pressing surface made everything too soft as well as a PITA if I wanted to press. The pressing cover became a wadder hiding in my back room. I found it yesterday and made the decision to cut it and recover my blocking board with it. Then I decided to close up my Morse machine and set up the cabinet as a mini ironing station. I love it. I also have enough left to make an entirely new cover for my regular ironing board. You can see I marked out the inches with a Sharpie. I steam ironed them and they are not going anywhere!

The cover is simply wrapped around the board and secured with duct tape, easy peasy. 
My next discovery was an unused CD holder out of wicker. Perfectly narrow and filled with compartments, great for the cutting table. It now has my weights, measuring tools, etc. and takes less space than what I was previously using. 

This was a good Re-purposing day!...Bunny

Tuesday, March 29, 2011

Organizing Elastics

At this moment there is nothing cut and waiting to be stitched. I am taking advantage by doing some more back room organization. I have this big apothecary I love. It seems to catch all sorts of mixed up things so I've decided to dedicate it to elastics. Could it be because I just received a great shipment from Fashion Sewing Supply of elastics and interfacing? Youbetcha!


You've seen this trick before with patterns, fabrics and laces. Today we will use the same technique for the elastics.
Take your 6 inch acrylic ruler and use it to start wrapping the elastic. Once it is all wrapped it is easy to slide off the ruler. Then I put a hair elastic around it all and voila! In the jar it goes!
Lately I have been saving empty plastic thread spools. I know......Their moment in the sun arrived today! They are perfect for clear elastic and tiny regular elastics. They wound up so easily. There is 5 yards of clear elastic on one spool and room for lots more! I put a piece of tape on to secure things and into the jar it went. I don't think I will ever throw out a thread spool again! I am imagining all sorts of uses now, bias strips, pipings......
*************************************************************************************
Now for some responses.
From Cissie:
Here's my issue with bags. I hate changing them out all the time. How do you manage this?
 I really don't change them often. Most of the bags you see end up being gifts for friends and family. I once in a while sell one or donate for a charity. I have seen those organizer thingies from Lazy Girl that look fabulous and may have to try that. They let you just lift out the contents of your bag and set it right into another one, pretty cool.

From Janlynn:
Is there a trick to pressing those tiny bulky seams in awkward places without burning your fingers?
This is where the wooden kitchen spoon comes in very handy. It's narrower and longer than a sleeve roll and in my basket of sewing tools now and forever. I still watch those fingers though!


To neighbourhood.gal:
Thanks for the heads up on the pattern. I haven't cut it yet as I am waiting for a back waist measurement from DD. Sophie is precociously tall and growing all the time so best check that number!

Thank you to the many new followers once again! Those bags seemed to have really spiked some interest and it is greatly appreciated. I love sharing with you all. It's all about keeping our art alive...Bunny

Monday, March 28, 2011

The Pussy Willow Bag

At least I think they are pussy willows! One thing I do know, this bag is a breath of fresh spring air. Once again it is Butterick 4409, this time minus any exterior pockets. The fabric is a Joanns home dec piece so it has a bit of substance and is 100% cotton. The faux leather is just a simple embossing, no paisley this time. The lining is a 100% novelty poly I might have gotten at the Fix. I love to have bright colored linings in my bags. A light color will soil and a dark color can be a black hole, so something reflective that provides contrast against the contents is what I shoot for. Here's a peek:
My son in law, who is a VP of Marketing, says I need to put my labels somewhere on the outside of the bag. What do you think? I may give it a try but would really love to know your two cents. I can see them in a loop in the seam of an exterior pocket or in a side seam. I have hundreds and hundreds of these labels. 
***********************************************************************************
This clutch pattern came home with me this past weekend. I haven't done a clutch from a pattern and these look cute. I am having some creative ideas here, maybe felting or painting. We will see what a dig thru the stash inspires. I also have some great patent leather I could try out too. My mind is really spinning on this one. 

We will be leaving to visit family in a couple of weeks and I want to make a dress for Sophie, my tall five year old. This pattern appealed to me and you can see the crazy colors I picked. This style and fabric are right up her alley. It looks like a pretty easy sew. I think I will cut it out tonight....Bunny

Sunday, March 27, 2011

A Chanel Bag and Some Bag Making Tips

Can you say love at first stitch? I really really like this little bag. It is the simple result of two non usable pockets and the tiniest bit of leftover expensive boucle. Add a bit of paisley embossed faux leather and I think it is just rather snarky!
I also couldn't resist taking the pics outside on such a beautiful day. It is about 20ยบ and the winds are wicked. I had to hold the top of the bag still to get most of  the pics.
The lining is Kasha, leftover from a coat project. It has a fused backing and does not ravel so I didn't double the pocket as I usually do. The pocket has darts at the bottom for depth.

************************************************************************************
I often bypass the pattern directions when making a bag. This was  no exception. I will show you a few things I do when I make bags that aren't in the directions!This pattern is Butterick 4409.
 
Whenever a pattern requires that a gusset be sewn all around the sides I break it down into sections. First I stitch the left and right seams, just going from dot to dot. I then clip the corner and do the bottom seams. Then I stitch across the last seam minus any curves. I save the curves for the end. On the curves I clip, clip, clip and they are then uber pinned and off to the machine. I find by working in sections like this I have a lot more control. It is so much easier to handle the curves when all of the other pins and wandering fabric are out of the way. You can also see a couple of other things I do in this picture. The area with the bull clips is controlled by , well, bull clips. This is where the faux leather straps are and I don't want to mark them with a pin. You can also see that I fused fusible fleece to all of the boucle and then topped with a smaller piece of Decor Bond craft fusible. I use this technique with nearly all of my bags. I don't like to bring the Decor Bond to the edges due to bulk but I find it makes the bag have a lot more structure, something missing from a lot of bag patterns. Without that structure the bag will quickly "limp out" and get the luvin' feeling and look way before it's time.  The faux leather is interfaced with hair canvas. I find this is the best way to treat this very sensitive fabric and am blessed to have inherited massive amounts of hair canvas from my dear friend Ima. It' is not the cheapest thing to buy but what a job it does!

 
Another trick is to use a wooden spoon to iron open the seams. Bag seams can be really tricky to get to and my seam rolls and board don't always do the trick. A wooden spoon to the rescue!
 One of the most important steps in bag making, IMO, is securing the lining to the shell. If you don't you will have lining fabric drifting aimlessly around the inside of your bag, not very professional.  So after the bag is complete, lining installed, I go and ditch stitch between the lining seams and the shell seams. I don't do every seam. It depends on the style. In this bag I did the gusset seams on top, what you see in the picture, focusing on those curved corners. I find in regular totes I ditch stitch the side seams to control the lining. This is done with a doubled waxed thread and a tiny back stitch. It is not necessary to go into the seam of the outer shell. Just pick up the seam allowances of the shell and you will be secure. You kind of get a feeling for this after a few stitches. When properly done, it is invisible.

And last but not least, DO ALL YOU WORK WITH THE ZIPPER OPEN! Don't ask why I recommend this. Let's just say I had to crawl out of a bag with no opening! 
**************************************************************************************
The Chanel bag is done and I am really pleased. I do think it is the last gasp of Ole Man Winter, however. The next bag, which just needs ditch stitching, is Spring itself and I can't wait to show you....Oh, suffice it to say, I will definitely not being using the Chanel bag the same time I wear the Chanel jacket, just toooooo much.......Bunny


Friday, March 25, 2011

Movin' On!

First, a big welcome to all the new followers! It is great to have you here. You are greatly appreciated and you comments are welcome. Jump right in!

First, some questions on the CJ:
From Blogger Jemajo: "I'm pretty new to all of this and would like to ask you if the lining satin is actually sewn though to the outer shell, or are they darts?"
   The lining is silk charmeuse and is stitched to the outer shell fabric, the boucle, with machine stitching in vertical lines.  It is then joined at the seam lines with hand stitching.


From Jemajo again: "Also the chain - is this to weight the jacket hem, or purely decoration?"  You are correct! The chain is there to weight the hem. I won't name drop but a very respected designer told me she uses the chains from JoAnn's so I went and bought my chain there. It was stitched on with a waxed double threaded needle.


From  Cynthia Gilbreth: Have you added labels to the jacket posts so it will be easy for your readers to look up? Some of us may want to try to make one and your postings will make a good resource. I did set up labels in my gadgets. I had too many labels initially and let it go by the wayside. You are right Cynthia, I need to get going on my labels again. Thanks for the wake up call!

**************************************************************************************
On to nasty business, the March pants. What did I do wrong? I am not sure but will offer a few possibilities here.

The pants are huge, even after taking them in. I am convinced this is the action of the lycra in the fabric. It literally seems to bag out as I sew or iron it. So now I have a pair of "fat pants" that I can save for when I put on a few pounds. Frankly, I will either wear these when I have on my long johns and am out in 20 below 0 or I will donate them. They just look that bad. I do NOT like lycra in my fabric mix, period.

The other issue clouding my judgment is the color. There is just something about brown fabric and me. It just looks like mud. I thought these would be perfect to wear with the CJ, but no way. Bottom line, these look awful. I will probably consign them to the Good Will. I do feel they were beautifully made, but made with fabric that was nasty. Honestly, this is what I get for shopping at JAs for wearable pant fabric. Next time will either be from the "Fix" or the internet, maybe some good ponte. I will NOT buy a fabric with lycra. Please don't let me........

Here are a few things I think I did right.
I cut the waistband on the selvedge and stitched in the ditch from the top side once attached. At the seams and darts I clip into the selvedge because it needs room to spread. Like most I have high hips bigger than my waistline so this little clip is important. I put some Fray Bloc on the edges and it is just fine. I like using the selvedge for the waistband as it eliminates bulk from the waistline. Who doesn't want that?
 
This is how I finish the fly area and crotch on a flat lined garment. You can see the fly extensions are flat lined and the seam edges finished. The bottom of the zipper is pinked. If these pants were a keeper I would bind the bottom edge of the fly. The crotch seam is stitched, stitched again an 1/8th of an inch away and then serged or zigzagged. 

Time to say good bye to the March pants. We will call them a donation. April is looking much more promising. I will be doing a straight legged pant with pleats. See how that looks on the ole pear!

In the meantime I am having great fun with a couple of bags. I am really pleased with their cuteness and can't wait to show them to you. They are so close to done so maybe tomorrow....Bunny


Wednesday, March 23, 2011

My Chanel is Done!

And what a learning curve it was!!!  I really can't wait to do another one. There is much I will do differently. I have issues with the fit that didn't seem apparent on the muslin. But no matter, I will get lots of wear out of this and like it with my beige jeans.

Here's my issues:
  • These sleeves were installed twice. Originally they  were huge. Did I add seam allowances twice? That is all I can figure. The shoulders were narrowed for my muslin and were just fine. I took out the sleeves, narrowed them, and re installed. This process came in at eleven hours. If you have made one of these you know the quilting, those three pieces of sleeve, the trimmed cuffs,  all got moved and redone. Oy,,,,,, none of this happened with my muslin. And with the expense of the fabric there was no way this was going to be a wadder.
  • The shoulders are too wide and need to come in. I compensated here by adding shoulder pads which usually makes a jacket look more balanced on me anyway. I guess I could go back at this point but for me it's time to move on. Redoing the sleeves took all of the steam out of this project. It's wearable.
  •  
  • Third issue is the actual pattern. I came to really dislike it as I went along. It is Vogue 8259. I find the sleeves very wide and feel they would be more attractive with a tighter fit as they near the wrist. I have mature upper arms but petite lower arms.  I deliberately made mine 7/8ths. My other pattern issue was the pockets. If you could look at this pattern straight on, which is near impossible to find a pic of on the internet, you can see how the pockets appear assymetrical in regards the center front. I think it is some sort of optical illusion happening with the trim, overlap and buttons. I have decided I like the look of the center front meeting at the edges with a closure of a hook much better. It just makes the pockets look  balanced in my opinion. This bothered me so much I left off  the breast pockets. I know they were where the pattern wanted them to be but it just didn't look right to me. Do you see how  my left pocket appears further away from the CF than my right pocket? It really isn't but with the trim and buttons and overlap, it looks assymetrical to me and bugs the heck out of me. Think I have an overthink problem? I won't use this pattern again. My next pattern choice will be Simplicity 2284 and I will draft a three piece sleeve. 
The good stuff:
  • I still think it is really pretty and I will get a lot of use out of it.  I really think no one but me and all you blog followers will know about my fit issues.
  • It taught me so much. I cut my teeth on this one. It is far from perfect. I will make another soon and am shopping for fabric as we speak. The next one will be much better. I may streamline a process or two on the next one as well. 
  • I love the details. How can you not  when this much work is involved? Handworked buttonholes with bound buttonhole facings, oh my!!!
  • Gotta love that chain! When it is all done and you stitch on that chain it is like taking final exams and getting the diploma! 

Finishing this jacket is the good news of the day! My March pants are another story and I will have more on that soon. In the meantime I am making two darling bags that are bringing back my sewing excitement!...Bunny

Saturday, March 19, 2011

Bagathon

Haven't hemmed those pants yet but will soon. It's been a mishmosh of finishing our taxes and spring cleaning lately. I did decide last night, as a direct result of my cleaning/re-org, that I wanted to make two bags. One will be inspired my my Chanel Jacket which I have been working on. Suffice it to say that I will never use the Chanel bag with the Chanel jacket, just too matchy matchy. But on its own, I think the Chanel bag, aka, CB, will be pretty cute. My inspiration were two pockets I made for the jacket that I decided were too small of a scale but couldn't throw out. I barely sqeaked out enough boucle to make the bag. The gusset and loops will be faux leather.
 The second bag is just some fabric that jumped out at me for it's "Spring-iness". What's more spring that pussy willows and a chartreuse green? It also will have a faux leather gusset. I like using the faux leather as it is easy to keep and stay clean.
This is probably the 5th or 6th time I have made this bag. I will be using  Butterick 4409.
  Lately bags that are "long" have really seemed particularly attractive to me. I have never made this design specifically for myself. If you read the notes you can see that my first bag had a slight mistake that I didn't notice till the end. Oddly enough, it all went together and looked fine although I did have a bit of a struggle. So my dumdum notes tell me the curve of the bag goes on the top and the sharp corners go on the bottom. I know....
The CB will be like the pink view and the pussy willow bag, aka PB, will have no pocket and a handle similar to the top left bag.

I am really excited about making these. I have done bagathons before and they can be so productive. I've committed this pattern to oaktag as I know I will definitely be making it again. Shouldn't take long to finish these. I will also get the hems on my Mud Season pants eventually and get a pic up too. Just not feeling the excitement at this point so be patient with me...Bunny

Thursday, March 17, 2011

Mud Season

This time of year can be pretty depressing. As the maple syrup steams in the sugar houses, we all have to look out our windows at dismal views of greying, muddy ground speckled with big obnoxious blobs of snow. Bit by bit the snow detracts and wells of brown ground are visible around all the tree trunks. By May the trees are greening. In the meantime it is Mud Season up here in the North Country.

Another personal aspect of Mud Season is my urge to purge and clean. Baskets of boots, slippers, shoes, sit at the back door. More baskets are filled with hats and scarves and gloves. The necessary use of the wood stove makes a constant need to remove dust. Windows are begging for sparkles. It is just time.

The past few days have left my March pants with hems waiting but  I did manage to complete a surprise project that I will show you when the pants are done. Those pants are brown, wooly, lined, and so indicative of Mud Season that they are hard to pick up and work on, even for a couple of small hems. In the meantime I have responded to my clean and purge urge.

What is it about cleaning that makes things messier before they get better? Yesterday morning the cave was respectably neat and ready to be worked in but then I started pulling.A little before and after:
The goal was to :

  •  Go through my fabrics for some springtime inspiration
  •  Put the heavy woolens up high and replace them with linens and cottons. That happened but is all to the right of the closet that you can't see. 
  •  Get fabrics back to being organized by type
  •  Go through the pattern stash for a purge. Well, I went through it, but didn't purge a thing. I do have to get more pattern boxes for further organization
So it just needs a bit more tweaking and my back room needs a lot. That's where the excess of everything and all my findings, buttons, etc. are. Not much left to do.

**********************************************************************************
Going through my patterns was fun and I did that last night. I have about 10 pattern boxes worth. I did find a few that I forgot were so cute, or that triggered some memories.Come along for the ride.
With all the hoopla over the new pleated full trousers on the runway I thought it would be fun to show this pattern. In their day they were really hot. Their day? 1992! Are you still wearing these???Shame, shame, shame! Vogue description:  "Radically relaxed fit, full leg...., paper bag waist, front button waistband, ...watch pocket,  front fly...wearing ease has been allowed for Calvin Klein fit."  I don't remember them fitting Brooke Shields like this.
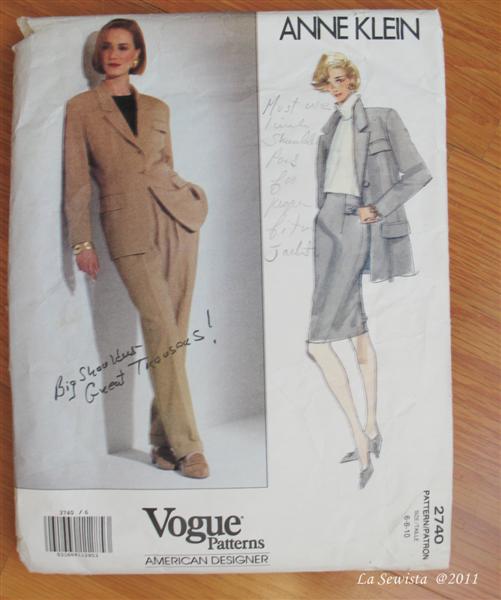
My notes on the pattern say it all. 'Big shoulders, great trousers! Must use one inch shoulder pads for proper fit in jacket." This is ca 1991. I made this suit with a pants, jacket, and a wrap skirt out of a lovely pinstripe wool, silk damask lining. I wore this suit till I could wear it no more. Yeah, those were in my suit days.
View C, another favorite suit. I pulled this one because that jacket fit so well and had a lovely cut that seemed scaled for a petite. I made this suit in black crepe with a looooong pencil skirt. It could look rather dour, but it made me look skinny as the dickens. I wore a big brooch at the neckline and always a belt. I miss this one.
This is probably one of the prettiest things I ever made. I had a swanky affair to attend with DH and made the short version in a white brocade with yummy gold buttons. Wish I still had it just to look at the inside. This is a Belville Sassoon, has a corset inside and all sorts of construction details. It is rated "Average". I don't think so!
This one I pulled because it is just so darling and I think if I made this up without the big bow in some linen it would be a darling summer dress. Whatcha think? It's ca 1985 !!!
This is another that I picked out for a possible linen summer dress. This would definitely require a muslin. The extended shoulder and lack of fit could look dumpy on me but if I could make it work with a dart or two, I think it could be darling. This one is ca 1999.

Thanks for coming along on the  "Urge to Purge" tour. Now I have to get the rest of our taxes done. Do you think a bit of procrastination is happening here? Never!....Bunny


Friday, March 11, 2011

Flat Lining, Part Two, Fly Front, Pockets and Stay

On to the front of the pants! These pants have a slanted side pocket, a front stay, a fly zipper and a dart.
Because of the stay, the dart must be put in first. After the dart is installed, interface the fly extension. Next tape your pocket edge. All of this must be done first because of the front stay.

I was out of dark fusible but this weft insertion doesn't show from the front and worked fine.
With the front details done, go ahead and install the pockets and stay as your pattern instructs. The pocket edge was topstitched before the stay was put on and machine basted shut before proceeding with the lining. If you need some help, here is a link to the tute I did on putting in a stay on the last pair of pants. The fabric used for these pants seemed more sensitive to showing ridges when ironed so I did not serge the edges of the pocket or stay. I used a tight stitch length instead.  Once the pocket and stay are installed you can go ahead and do the "flat lining" the same way it was done on the pants back legs with one difference.Put your dart in on the lining so that it faces the inside. You can see the dart completed in the pic below.
Once again, only the vertical seams get enclosed. That means you will stitch the fly extension but none of the curved seam below. You could go ahead and serge this area. I am going to wait until the crotch seam is sewn and then trim and zigzag together. This is how it was handled in the Threads article, more or less. They were showing more specifically how to do a back vent. I will also do a Hong Kong finish on the straight section of the center back seam.

Once all your flat lining is complete, install the fly and sew it up! Obviously this should be done on a pattern that you  know fits without further alteration. Remember, all your VERTICAL SEAMS will be sewn with a HALF INCH SEAM ALLOWANCE. All others will default to the 5/8ths. Once the hem is established, finish that off  with a Hong Kong finish as well. I'll be back with pics of the completed pants this weekend. I also have another special to surprise to show!..Bunny

Thursday, March 10, 2011

Flat Lining, Part One

Flat lining is a great way to line garments with simple lines like  straight skirts and  pants. It finishes the seam edges with a Hong Kong finish and underlines them at the same time. Today I will show you the basics using the back pieces of the March pants. These are a rayon poly but look a lot like a worsted. They definitely don't have that poly look. The lining is a poly anti static from JA's that I have used before. Not my preferred lining fabric but the fashion fabric is not the most expensive so I don't think it warrants Bemberg or silk.
I learned this technique directly from Threads. If you have all your old Threads like I do or if you are lucky to have the new DVD, it is in Threads issue #42 from 1992. I am sure others have put it out there so check your libraries.

The first thing you do is cut and mark your fashion fabric. You can use those cut pieces as your pattern or just use the pattern. Lay the pattern out on the lining. Cut all VERTICAL seams ONE HALF INCH BIGGER THAN THE PATTERN. Somewhere I have seen the directions for this calling for 5/8ths of an inch bigger but the Threads recommended half inch has always worked fine for me. If you are using a really bulky fabric I would cut them 5/8ths of an inch bigger to more accommodate the turn of cloth.

Do not cut the crotch seam bigger other than the fly extension.

Once the lining is cut out, place right sides together. Put the quarter inch foot on your sewing machine. Yes, the lining is bigger. Line up the raw seam edges of one of the vertical seams, right sides together. Stitch with a one quarter inch seam allowance.
Iron the seams together to meld. Cut off one eight inch of the seam allowance. I like my rotary cutter for this. You are now left with a 1/8 inch seam. It is important to remember this because if your garment has 5/8th inch SAs, now when you go to sew it you will use a 1/2 inch seam allowance instead. To be clear, you just cut off one eighth inch of the seam allowance. What remains is a half inch so that is your new seam allowance to complete all of these vertical seams only on the garment. whew---

Back to the ironing board. Iron the lining away from the fashion fabric on the right side. Use a cloth if needed. Now wrap the lining around the cut 1/8th inch seam to the wrong side. Pin next to the well of the seam to get a nice tight wrap. Iron in place.

Switch your machine foot to the edge stitching foot. Stitch in the well of the seam the length of the seam. Press. Do the rest of the vertical seams in the same fashion being very careful you don't get your right and wrong sides mixed up!

Once your edges are all bound, lay your fabric out. Do some diagonal basting on the straight of grain. Some styles may require more of this than others.

Once the diagonal basting along grain is done you can proceed to do your darts. Make sure you either baste or pin down the center of the darts to keep the fabrics snug.

On these pants I then taped the crotch with a strip of selvedge. The tape was cut to the length of the crotch on the pattern. It was sewn down but once I reached the curve I pulled it and eased in the crotch curve so that it ended at the exact correct length.

What I have shown you is on the back pieces of the pants. My TNT pants pattern has pockets and that beloved pants stay as well as the crotch curve and zipper.  There are also more darts in the front so the front is handled a bit differently and I will show you that in the next post.
One great thing about this technique is that when you are done sewing these vertical seams, your garment is pretty much all lined and the seam finished.

*************************************************************************************

The blocking board is dry. It looks a lot better. It seems I just rearranged the water stains but  they are also a bit  lighter. Bottom line, I got a couple more years added on to its lifetime...Bunny

Wednesday, March 9, 2011

Spring Cleaning

While I need to get to cutting out the lining for the March pants, my glaringly stained blocking board stared at me, no matter where I was in the cave. I decided to clean it some how. I wasn't sure if the whole thing would just fall apart once it got wet and I tried not to super soak it. In the end it did get totally wet.

I used this blocking board constantly. It is used to block smocking, to make sure collars halves are exactly alike, and just general quick ironing. It seems to get used several times a day, most days. You've seen it in my posts. It is grossly stained, seems water stained, at this point and I figured before I laid out 30-40 bucks for a new June Tailor Pressing Board one I might as well clean it.

First thing I did was cut (gasp), a hole in the back of the board, just  a nip to see what it was actually made of. It appeared to be chipboard covered with a thin "bag" of plastic, like a ziploc. The top is densely padded. I saw the innards and decided it was a go. I wasn't going to soak this thing as I was not sure it would ever completely dry, at least before next Christmas! I sprayed it down with Oxy Clean and started scrubbing. Meh, not so great. But when I walked away for a few minutes it seemed the Oxy just needed time to get going. I got it as good as I could without a soak. I then took it to the sink and placed it soap side down and sprayed the Oxy off. It was not soaked. Then it was on to some Dawn. Dawn never hurts, right? That's the stage you see above, scrub and scrub. This seemed to really be doing the trick. Once I got the Dawn phase over with it was back to the sink sprayer to remove the foam. I pushed out all the water I could just pressing my hands and rubbing down on it. I guess you could say at this point it was now soaked. Now for phase three. I mixed some water and bleach and rubbed it all down with a paper towel soaked in that mixture.  I let it sit a while then did another clean water rinse to get the bleach out.

OK, I now have a soaked board and it is feeling slightly limp in a spot. I put down two layers of a big fluffy towel on the floor, put the board face down on the towel, topped with another towel, and started walking on it to squeeze out the moisture. It worked. I needed to do this a couple of time to really get it all out. It was still moist but not soaked now. I let it sit overnight. Wow, did it look better in the morning! It still had a bit of pale stain in one area so I did another bleach treatment and it is drying now. It will hopefully be back in usable condition within 24 hours. I'll post pics when done. It was so gross before and I was always afraid the stains, albeit water stains, would somehow telegraph to the work. Now I can relax, I hope.

*************************************************************************************

A few thing on the home front are catching my attention this morning but after that it will be to the cave to get going on the March pants. These will be "flat lined",  a favorite technique that I have used off and on since it was first in Threads in 1992. It looks like our weather will be turning horrid again tomorrow so I see lots of time to work on the March project. Till then....Bunny

Had to Refurbish This One!

    About  6 or 7 years ago , during the dawn of the Zipper Trend,  I bought one of my rare retail items. It was a blush pink and black bord...