Sewing Vloggers

Tuesday, May 28, 2013

Bulletin Boards, anyone???

I'd be willing to bet that a good 85% of all  our sewing spaces contain a bulletin board. I'd also bet we each use them differently. Some are strictly inspiration,  others tracking centers and even other family albums. Mine seems to be a little bit of all of those things. What is on yours? I would love to know. Here's my breakdown.


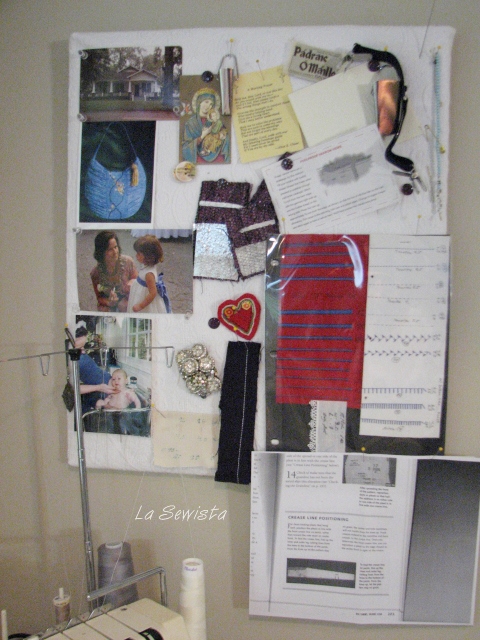
  • The home I grew up in and loved in Lafayette, Louisiana. They tell me now its on the National Historic Register. Those are huge pecan trees that we used to pick by the sackfull.
  • A holy card remembrance from my Mom's passing. 
  • A bias tape maker
  • Buttons that I love and think are so pretty but can never find a use for
  • A pic of my smocked bag that came in honorable mention in the Kaufmann fabric challenge.It toured the country too!
  • A piece of wool boucle with an attempt at foiling on it. I like it but who wants to foil expensive wool boucle. There is a lot more of that boucle in the stash. 

 
  • A picture of Sophie with Bunbun in her flower girl dress made by same. She is eight now and growing to be such a beauty. 
  • Me bathing my first born grandchild. This was the thrill of my life. His parents left him with me for a weekend. You grandmothers all understand. He is eleven now and so tall.
  • A brooch I made out of rhinestone buttons I picked up at a Hadassah Thrift sale. The suit was awful but the buttons were great. Once in a while I actually wear it and it looks great on a black coat. 
  • Sample of a topstitching technique. 
  • Practice piece of embroidery with bullions on some red cashmere. This became one of many embroidered hearts on a little cashmere coat for Carly. 
  • Notes on a fabric swatch regarding stitch length, tensions, etc.
  • A lonely black button???

  • Another bias tape maker
  • Label provided with some Irish wool that a family member gifted me. 
  • Clip for pants of swayback women. You clip it from belt loop to belt loop to pull in the back. Haven't tried it yet.
  • My bracelet from the hospital where I was born. My Mom always kept it and I found in her box of special things when she passed. At one time you did not get a plastic bar coded bracelet as a hospital ID. You got a bracelet made of ceramic beads with  your name spelled out. It has my name right but clearly gender difference were not being made with the color of the beads. 
  • Morning prayer to start my day on the yellow card. 
  • Thank you from a treasured sewing friend I helped. 
  • Directions from Threads for a tiny hem technique, not the Kenneth King one.
  •  Chart I made giving tensions, widths, lengths of stitches I use frequently. This has been invaluable. 
  •  Photocopy of a page from somewhere telling how to get the straight of grain/crease on a pant leg. I always seem to forget this. 
This little bulletin board, covered in white metalasse, thank you, really says a lot about me, about what I value. What does your sewing room bulletin board say about you? Are you strictly fabric swatches and patterns? tons of family pictures? pics of garment completed? I would love to hear what's on your board. Curious minds are asking...........Bunny

****************************************************************************

We live pretty close to that area that got the 36 inches of snow in upstate NY two nights ago. It is now melting and coming downstream. Our river is now roaring but as always safely away from the back door. But the roar!!!! You can't imagine...................Bunny


Sunday, May 26, 2013

Simplicity 1783 Complete!


I love this blouse. It turned out differently than expected but I am pleased nonetheless!  Here's the 411.

Pattern: Simplicity 1783, another Cynthia Rowley design. It is simple but has a few challenges that might put off a beginner but I say go for it. It's worth the effort and you will gain a few skills from the experience.

The design is fitted from the waist down with release pleats. There are also two box pleats at the neckline and there is a LOT of ease here, 40 inch bust finished measurement on a size 6. The back has a peekaboo placket, actually just a finished open seam that ends in a loop and button at the neck. The neckline and sleeve edges are bound with bias. I used self trim but this would be darling with a contrasting trim. I would have loved to used black trim but I wanted some versatility with this top so the black was out. 

There is also an invisible zipper installed upside down in the side seam.

Fabric: 80% rayon, 20% linen. It's in the classic oatmeal color that belies less expensive linens. Doesn't that oatmeal linen come from Poland? Anyhoo, this did not come from Poland. It came from JAs and you know what that means, the Pacific Rim! (I'm so polite.)  But the combo is what I love. It has that linen look without all the wrinkles and the beautiful drape of rayon. It washed beautifully on cold water, gentle with no shrinkage. 

Construction:  The order of construction is a bit different but that is because the top needs to be hemmed before installing the invisible zip.You have to pay attention with this pattern. I found all the different size markings for the pleats a bit confusing and suggest you find  your size and mark the lines with a colored marker.  
Back to the zip - the pattern says to put the zipper stop right above the hem. Then you turn in the SAs on the zip. While this makes the zip close all the way down wrapping the zip SAs around the hemmed SAs is bulky and could have looked better if the zipper end 3/4 of an inch from the hem edge. I will definitely be making this one again and will do that.

Also, because of the slightly different order of construction, It is hard to fit this top. You can't adjust just one side seam if you find it too tight,once that zip is in. The best way would be to let out the pleats as needed. I would recommend stitching the waist/hip pleats with a basting stitch and then fit before putting in the zip. Then adjust as needed.  Also do flat pattern measuring before cutting anything out. There is loads of ease in this pattern so it's hard to flub. Unless......

Are you swayback? I now realize this is an important adjustment to make if you are. The hip area fit fine on me and measured out fine. Because I didn't do my petiting I have a blouson effect happening in the back. But truthfully, I like it and call it a design detail. Next time I MIGHT do a swayback adjustment but I also might leave it the way it is. I like the blouson effect.
I think wearing this with a belt would look great and take care of my lack of SBA. 

All the seams are serged and most topstitched as well. That's my standard way of dealing with linen and finishes it off so nicely inside. 

The sleeve hems run very narrow and fit over the wrist just barely. I think a slit would be cute on them and may do that the next time. For now they are bound like the pattern. The hem is simply serged and double stitched.

Conclusion:  I will definitely make this again. I will try a swayback adjustment and a slit or larger lower sleeve. Other than this, it's love. This would be stunning in a charmeuse. I like how this design is soft looking, has ease (unlike all the knit tees out there), and is not the same ole same ole wrap or tee top. I like that it has some curve appeal also without being tacky tight. I don't care for tacky tight. Negative ease gives me anxiety attacks.  It's nice to have other options and this one will go in the Tried and True status with those adjustments. Highly recommend with reservations regarding techniques required....Bunny


The Deer River is raging today. We have had a week of constant rain. You can see the white water between the trees in this pic I took from the dining room window. Below is our fire pit, way underwater.

I hope your holiday weekend is sunnier, dryer, and a lot more fun than what has been going on in the Northeast this weekend. Bless all who went through the horrid tornadoes in the Midwest. I'll take our blizzards any day.........Bunny

Saturday, May 25, 2013

Simp 1783 and Those Scratchy Innards!

Plans have changed! Before I start any new project I read the pattern  thoroughly.  When I did this, after I wrote the last post, I realized that the lovely placket I was thinking of doing was already there in the pattern and that the zipper spec'd was in the side seam, opening from waist to a couple of inches below the armpit, basically installed upside down.  I decided to go with the construction per the pattern. I have done these underarm invisible zips before. I like the look. I do not like  the scratchy itchies that happen  in the area at the top of zip under the arm. The semi rigid zip seems to love to dig into that area.  So I decided to do something about it. And that crooked seam? It will disappear as you will soon see. 


First I found a little piece of poly taffeta in the stash and cut it into a rectangle. I fold back the bottom and two sides and pressed. The top is left raw.

This rectangle is lined up on the bottom of the zip which in this case at the top. The zip was installed upside down and  longer than the opening and cut back and stitched to stop the zip from pulling out. It's a lot easier to install an invisible zip this way.  You wrap the side folds around the seam allowances and then  hand stitch the bottom fold to the zip. Next I stitched it to the seam allowance to keep it safe until the sleeves were installed.
Now I don't have to worry about the itchey scratchies.

I have to say, I think I have another TNT. I am loving this pattern, particularly in this fiber blend of rayon and linen. It wrinkles just enough to look good, if that makes sense. All I have left now is the handwork which is basically bias bindings to be hand finished on the neck and sleeves and a hand worked button loop. I can't wait to wear it!...Bunny

Friday, May 24, 2013

simplicity 1783

My next project begins! The two print pants shown in the last post both will work well with a natural colored linen top. At first I was thinking the third iteration of TNT Simplicity 2192, a Cynthia Rowley design, maybe with some hemstitching. But today found me in town buying my fabric for this top all while JAs was having a 99 cent pattern sale on Simplicities. I ran back to check the yardage on 2192 and of course got sucked into looking at the catalog. This new Cynthia Rowley design, Simplicity 1783, jumped right out at me. I think it is quite interesting and hope it also becomes a TNT. Some designers just click with us, don't they? And some never work which you know full well if you've been reading this blog for a while. 


 I love the look of this top. The neckline is first box pleated then gathered. There are three more released pleats from hip to waist in the front and waist darts in the back to give it a lot of ease in the bust area. A size 6 pattern has a 40 inch bust measurement so lots of ease there. Because of that and some flat pattern measuring I am going to cut and sew, no muslin and no FBA.  Crossing those fingers!  It also calls for an invisible zip. No, no, no. I am going to do a placket of some sort and pull it over my head, sort of the way it actually looks in the technical drawing above in back, view B.

At this point everything is cut out and marked and I hope to get sewing after dinner tonight. This top will be very plain in this fabric and I am thinking how I might jazz it up, but not jazz it up so that it detracts from the pants which make a big statement with their prints. We'll see how this works out, maybe something with the bias neckline or a lot of topstitching or such. I feel some samples coming on!

The fabric is 80% rayon and 20% linen. It makes a a great blend. The fabric drapes and washes beautifully and barely needed ironing but it still had that natural linen look, unlike linen synthetic blends.

So this top has to get done before I go back to work so I can wear my print pants. I am just lovin' those print pants. They even have names. There's the "Boho" for the floral denim pair and then there's "Inkspot" for the mottled black and beige pair. Sometimes fabric just cries out for a name...........Bunny

Thursday, May 23, 2013

Zen and Fast Fashion

Two diverse topics but today they have things in common in my sewing room. First to the Zen:

I did hems today, by hand and machine. I took in waistbands. There is something very meditational about doing mundane repetitive work such as hand hemming. I enjoy it. It's satisfying, calming, and helps me have a better wardrobe than off the rack as well as some serenity time. All of these pants are off the rack. There are two pair of fleeces for hubby. He never wears such things but now needs them for his therapy. Then there are three pair of "thin" pants. I don't call them skinny pants because they are not skin tight and I couldn't look skinny if I tried. But years ago I wore "thinner" pants, ankle length, not skin tight but a definite more slender profile. I like the look. Alas, they went out of style and it was back to trousers. But I always missed them. In my opinion, on  a petite, even a curvy one, a closer cut was in better proportion. Once again, I am not talking tight here, just slim. Think Audrey Hepburn, black silk pants, hemmed at the ankle bone.

Pants like this do not exist where I live up here. But I saw them everywhere in Mass. and NH recently and couldn't wait to get my hands on a pair, or two , or three (wink;). Why didn't I just make them? Well, right now time is at a premium. I would need to work out a new sloper with this profile and I just don't have the required free hours to do it. I'm on vakay this week and went down to NH to get some dental work done by  my daughter. I brought my supply of gift cards with me to spend. I managed to find two hours to hit the store and this is what I came home with. So Zen was the feeling as I stitched through those hems and got them properly at my ankle bone a la Audrey. I love these pants. Are they perfect? On to Fast Fashion:


Well, for one, they are made in China. At this point and from what I have read I think that is better than Bangladesh. They retailed from 70 to 100 dollars a pair. Of course I didn't pay retail, but not far off. Here's what I saw in my fast fashion at that price:

* Hong Kong seamed waistband

* Understitched waistbands

* Nice fabric that I would actually buy to make my own.

Not too bad. But  the surprises awaited me. I went to sew the hem on my Boho floral pants and found this.

Now I really don't know what the green embroidery floss is doing here. It goes 6 inches only up from the hem and is a chain stitch. I don't get it. Then there is the lovely little tuck in the hem seam from the seam allowance. I undid it and fixed it. It really bothered me. I also reduced the bulk you see in the hem. No seam allowance was trimmed back to eliminate bulk. Why would you? Bunny can do that herself. (eye roll). OK, the Bohos are now fixed.


But here is the one that really fried my ass. And I never noticed it while trying on the pants. Fast Fashion is getting worse by the minute. In the top and bottom pics you see the back pants leg. It is seamed at the knee! This is not a style line, trust me. This is to save fabric and still be able to churn out cheap fast fashion. Look closely at the top pic and you can see the piecing across the back of the knee, barely visible, so why would you other than to save fabric? I have the black pair turned inside out for pressing and look at that! This is only on the back legs. So next time you go shopping make sure you check out the back of the knees. This one got right by me and I didn't find it till this afternoon, back in NY. I don't mind it on the print because it is pretty well camoflaged but on the black it is quite obvious. I guess I will call it a style line in that case. Do we have to pay a freakin' fortune to get a whole pants leg today? Honest to goodness.........Bunny


Sunday, May 12, 2013

Simp 4138, and some Poly thoughts!

Im the first to admit I'm a rather free spirited sewist. I could not handle a SWAP if my life depended on and would probably go nuts just trying. But that doesn't mean I don't have goals and plans. I never have enough white shirts. White's a color that looks good on me. I'm a "Winter" and us icy winter types look good in white, not beiges. (Don't ask how much beige is in my closet!) So I had the goal to sew three white shirts/tops and that has been met. Now I'm on a skirt buzz. Skirts are perfect for my work and I hope to make a few. One thought is some of the patterns for skirts that I like take so much fabric. What you see above is not one of those. This is a simple 6 gore trumpet skirt, knee length. I fretted over the length. Every bone in my body that lived through the sixties is begging for a frumpy long skirt, really. I've taken pics and know that mid knee is the most flattering length on me. But for some reason I never make that length. I've decided, in my dotage, to poo poo the sages and wear my skirt lengths at my knees if that is what looks best. So what if said knees are a tad baggy. Photographs taken by my hubby brought me to this enlightenment.

What you see above is my perfect idea for work, a crisp white shirt, a belt to highlight my waist while it lasts, and a loose, flow-y, colorful skirt. I just feel so neat and crisp in an outfit like this. I know it's not coming down the runways right now but color is and so are those gladiator sandals so I'm good with that. Accessories are a great way to keep your maturing style updated. I actually love to wear classics and have trendy accessories. That has served me well. Plus it is something that flatters me at this age. Most runway business doesn't. I am not a fan of tee shirts or knits and I guess I go against the tide with those opinions but at this stage I am pretty sure of what is flattering and still comfortable for me and that's what I make.

The skirt is 100% poly "stuff" from Joanns. It has a crepey texture and is fairly opaque. I will wear a short slip with it.  These poly "silkies' are quite seductive with their wonderful color and design but they can be a bitch to sew well. Here are just a few hints that I thought might help. Haven't we all succombed to their look and price point?

Mark the right side of your fabric. Often the sides are just the slightest bit different from each other, not enough to notice until you put them together wrong. Lo tack tape does not stick to these. So I pinned the tape because pins don't want to stay in this fabric either. Which brings me to pins......

THEY WILL NOT STAY IN! That is unless you have the double pins from Clover. I found these to work wonderfully at holding this nasty fabric.

Start your seams on a piece of paper stabilizer that can easily be ripped right off. Use a "single hole" foot and plate. It makes it much easier to work with this fabric and prevent it from being sucked into the nether regions of your bobbin area. I like the 1/4 inch quilting foot as it is a great help for French seams.

This garment is all French seams. Because the fabric is a stripe I needed to cut the pattern out on the cross grain. That can be a gold plated invitation to pucker seams and I was very worried the French seams would not work on the cross grain. I have had that experience in the past. So it was time to make a sample. I made a fairly long sample with a French seam on the crossgrain and it worked beautifully. I hung it up to make sure it hung ok. You just have to sample these things when sewing, one of those lessons you learn the hard way.
 
Here you can see it hanging from a shelf with no puckers.  I did set my tension to "normal" and a stitch length of 2.0. I like small stitches when I am doing French seams, particularly on something that ravels. 

To do the hem on this fabric I used the Kenneth King Tiny Hem technique and it came out beautifully. I just love that technique and you can find it in the tutes in the sidebar. It is so quick and easy. 

So with this project I got some quick gratification, a good thing after working six days this week. Sometimes you just need a colorful easy hit of sewing and this filled the bill. I am not going to review the pattern because it is so simple and classic and there must be loads on Pattern Review. It is  easy classic. Now maybe I'll make one of the long versions, a la frumpy.......Bunny


Thursday, May 9, 2013

Simplicity 2255, a Skill Builder


There is nothing fabulous or outstanding about this effort. It is a basic mandarin collared, 3/4 sleeve, pocketed shirt. Will I wear it a ton? You bet! I love my white shirts and this is a classic throw it on.

Pattern: The pattern is Simplicity 2255, described as a tunic. I call this a skill builder because it has the mandarin collar, a good step before a notched collar, pockets to make and line up, and a simple finish to the sleeve hems. The pattern has various sleeve options and lengths.


Fabric: The shirt is made with 100% cotton seersucker. You'd never know, however, that it was seersucker as the required pressing and later washing and repressing seems to have removed any semblance of lines of pretty puckers. That's OK. I still have a nice white shirt that washes beautifully. 

Construction: I took a bit of liberty with the pattern, but not much. Tunic length patterns do not work for me so I opted for the shorter version, View B. I did not do the gathered sleeves however, choosing instead to make a deep hem at the cuff area. Three quarter sleeves are my go to. I did my usual "petiting" of the pattern as described in the tute in the sidebar on the right.

The hem was made a bit more "shirt tail" with a higher curve added to the side area. I think that is a more flattering look for the hippy among us and I'm not talking 1968 here.

All seams except the armscye were french seamed.The armscye was stitched and serged. 


The sleeves on this pattern are really well  drafted. I did "petite" them but they fit into the armscye beautifully. 
I followed the template for button placement. The buttonholes came out wonderfully with my trusty old Kenmore but as you can see the placement doesn't work. I think the top buttonhole is maybe meant to be left open as it pulls the whole CF when closed. The neckband tapers out to the shoulders so making the button where they specify is like putting a square peg in a round hole. Next time I will make the first top button mid pocket  and let the band fall where it is cut to fall. For now I will wear it open with a cami. The blouse fits much better with that top button open. 

Conclusion: This is a simple, no nonsense shirt, one that will be a wardrobe staple and also give you some good skill building opportunities. I may make this again, but my preferred tailored shirt pattern is one with a shoulder princess seam, all the better to fit, my pretties.   I would definitely recommend this to a newbie who wants to try the next level after managing tee shirts, or anyone who is on a white shirt binge and looking for a classic.....

***************************************** 

Have you ever made something, loved it from start to finish, but then in the real world found that maybe you were always tugging at the waist, or the fabric was wrong and too hot to wear, or the style just not you? I am going to start doing "Reality checks". I will go back to some of the things I've made when an issue crops up and give you the real deal in the real world. Sometimes our imaginations exceed wearability or a technique turns out to be totally inappropriate or can be done better, things like that. What do you think of having reality checks on the reviews here?.....Bunny 

Monday, May 6, 2013

"Antipast" Inspired Upcycle


 I finally finished the hand applique on this modified Simplicity 2192 from Cynthia Rowley. It has become my TNT go to tee top and I love how this upcycled version came out.  It was inspired by a version on the Worthwhile website, poorly made, IMO, and way overpriced.


Pattern: Simplicity 2192, a Cynthia Rowley design. The fit has been petited and I love the bateau neckline and 3/4 dropped sleeves. Don't let anyone tell you you can't wear a bateau neckline if you are short. Are you kidding? It widens narrow shoulders and works great with a long neck, IMO, a shorter neck maybe not so much. It has always been one of my favorite necklines. This pattern is easy and whips right up.

Fabric: This under tee is a sheer 100% cotton which the camera makes appear to have more solid looking flowers. It really is a softer and sheerer looking in real life. The "lace" part is a former crocheted lace sweater that I shrunk miserably and never had the heart to chuck. I can't chuck a nice textile, never mind the fit. It's "shrunken-ness" made it sort of felt and tighten up so it was very cutable and didn't ravel. The neckline and wrist trim is Entredeaux, a classic heirloom trim.


Construction:   The first thing I did to this pattern was add center front and center back seams, like the inspiration piece which you can see here:

photo courtesy of Worthwhile

My top has dropped shoulders and I used just the sheer cotton for the sleeves, no lace.  Almost all seams are French seams, including the underarm seams. That was a bit tricky  because they transitioned from French seams to a placket with a teeny hem. I will try to do a tute on how I did it later. The hem was done with the Kenneth King tiny hem technique that you can find in the tutes in the sidebar.

The wrists and the neckline are finished with entredeaux, a ladder like heavy cotton embroidery used often in heirloom sewing.  These seams were reduced to a 1/4 inch and the entredeaux stitched with an edge stitching foot exactly up to the edge of the trim. The fabric was pressed away from the trim, double topstitched, and then trimmed back to the stitching.


The armscye was also double topstitched.

The sweater was appliqued to the top before the side seams were sewn and after fiddling around with them on the dress form. I had more crocheted lace than I needed and trimmed it back to fit the bodice the way I envisioned. Since pins would not stay in I needed to find another way to secure the crochet to the top. Thank you Steam A Seam! I cut little bits of it and pressed it on the more dense edge areas of the crochet but not along the hem. I wanted the hem to hang free. The crochet was then ironed in place and it was very easy to stitch. Size 80 heirloom thread and back stitching made the stitches pretty much invisible.

Bottom line: I love this top, got plenty of compliments at work today, and take great pride in the fact that it is constructed far better than the original 395.00 top. Don't you just love to sew?

Apologies here for the cranky looking face pic. Staring at my vinyl siding doesn't really inspire me to facial pleasantries. I guess I should imagine something pleasant.  My handsome photographer is still in the Boston area and getting great health care.  . I am back home working for health care coverage. You do what you gotta do....our girls are taking very good care of him....Bunny

Had to Refurbish This One!

    About  6 or 7 years ago , during the dawn of the Zipper Trend,  I bought one of my rare retail items. It was a blush pink and black bord...