Sewing Vloggers

Sunday, March 31, 2013

White Shirt Number Two Begins

I've spent the weekend working on Simplicity 2255,  a blouse/tunic pattern with lots of variations, most of which I didn't like. But I have an ulterior motive with this one, a motive beyond another white shirt. My wardrobe needs white shirts. I love white shirts. But I also love chambray / lightweight denim shirts and my collection has unfortunately turned into house painting apparel. I love to wear a denim shirt BIG, so I can belt it, roll up the sleeve and my fave denim shirt of all time was one I inherited from my brother. That's the kind of big I like. This is something I can wear with a long gathered skirt, some capris and wedges, and dress up with lots of jewelry. I think you get the picture.

I am doing view B, without the ruching on the sleeves, too much foo foo. This blouse has bust darts that end in the pockets, sort of different and I am not sure I like that. I found I had to lower the pockets one inch to look right but I also had to lower the bust dart to fit right. So the pockets still had the bust dart ends inside of them, just lower to accommodate the effects of my personal gravity.  The back has  waist darts for a bit of curve. I left them out. I want a man tailored type shirt . This neckline isn't quite that but I was more concerned about experimenting to see how wide to make the bodice to get that man shirt look. I will then transfer that info to my denim shirt pattern, whatever that turns out to be. I also did an FBA on the blouse as well. I like the way it fits now. It is cut straight down from my armhole and is roomy and square, perfect. The length of View B fits me like the models blouse. If I did the tunic length it would turn into a dress.


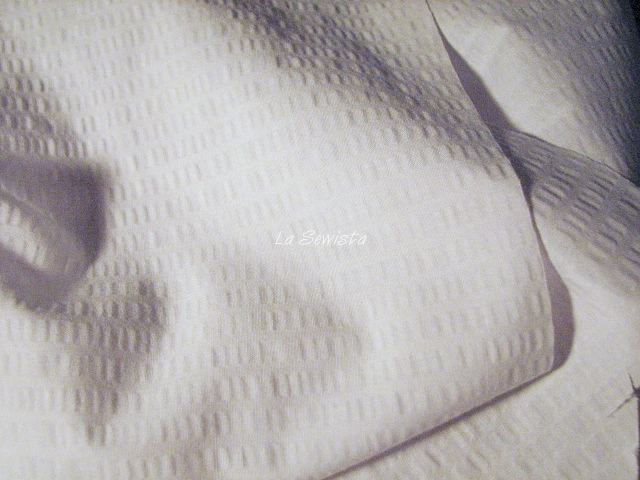
The fabric I chose is a basic 100% cotton seersucker. I like it because it has some weight and is not sheer, unlike a lot of white shirtweights out there. But once it's ironed the seer doesn't sucker any more. It goes flat and I don't like that. I have prewashed and ironed this. I think when this shirt is done I will just throw it in the wash and drip dry and see if it puckers up again. I am pretty confident it will.

My last post I made a big deal out of flat pattern measuring. I did that here and added accordingly. I woke up in the night, really, with a Eureka moment remembering I didn't include the width of the CF band and was afraid the shirt would now be too big. Doesn't anyone else get those nocturnal Eureka sewing moments? Crazy! Anyway, it all worked out.

I just found this pic of McCall 6613, exactly what I had in mind for my denim shirt. I hope to wear mine a bit more elegantly than this pic though. Looks a tad too Adirondack for me.


At this point all is done on Number Two except the sleeve insertion and a bit of topstitching. I have been trying to get some early morning sewing in before I get ready for work and really have enjoyed that. So hopefully it won't be too long before this one is done and I move on to White Shirt Number Three, more, much more pintucks on that one!....Bunny
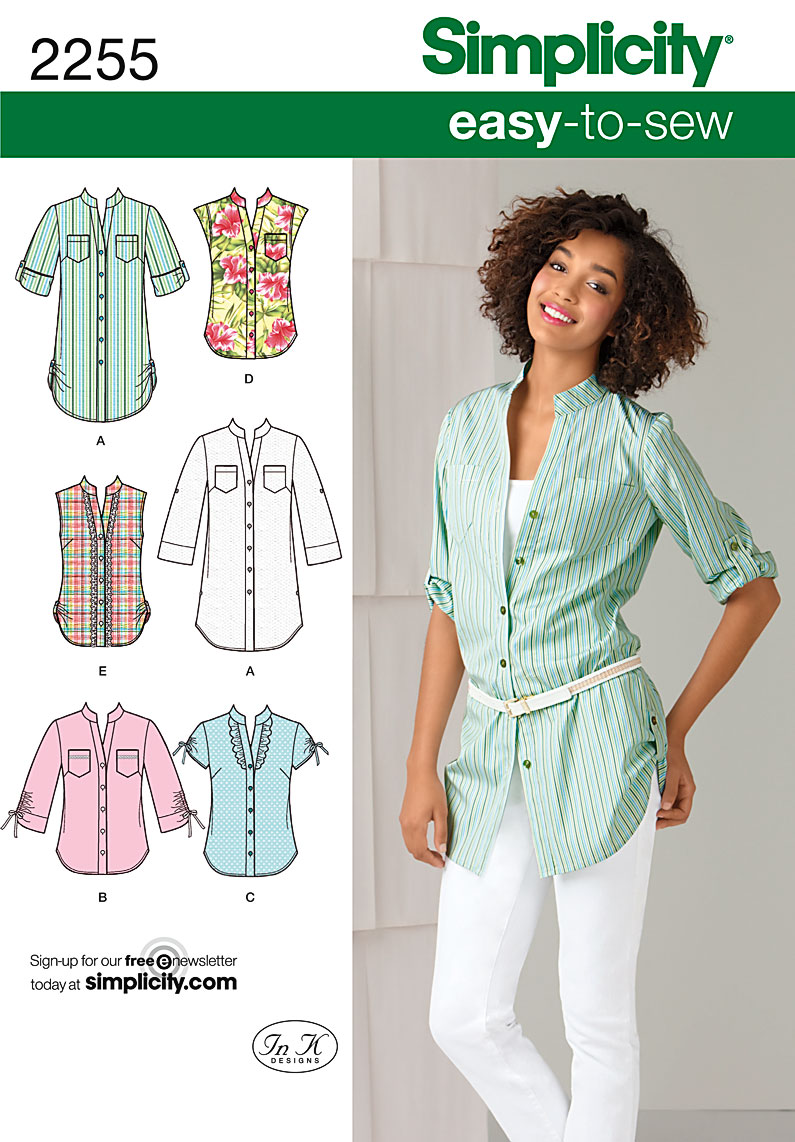
Saturday, March 30, 2013

Cynthia Rowley Top Finis!

Can you tell I am happy with this one? Well, I am and will make it again. I think the picture taking and editing was the worse. I did have to do a bit of fiddling with my pic editor to show you the details. White and black fabrics are notorious for needing that. The 411:

Fabric: 
     97% cotton/3% lycra damask in a reptilian design. It has lots of crosswise stretch. I purchased it forever ago as a lining for something that never got made. Since I adhere to the "Just Cut It" philosophy of fabric hoarding, I will buy more lining if I ever get to that project. No biggy, you can't take it with you, and this blouse gives me a lot more satisfaction sewn up than sitting in a long queue.

Pattern:
     Simplicity 2192, a Cynthia Rowley design. Aren't her looks great? I find them very wearable. I had  a minor issue with this pattern. First it did not spec any grading of the edges or understitching and I did both where needed. Next, it has you face the neckline and topstitch near the outer edge of the facing. That is perfectly fine and what I did. But when you get to the hem at the very end, it has you turn the facing to the right side for a totally different look, that of a facing turned to the outside.  While I think that is fine also, it is not consistent. I believe in repetition of details, not having one of each method. So be aware of this and do one or the other, either outside neck  AND hem facings or inside and topstitched on both.  This is definitely beginner doable.

Fitting:
      This is an easy pattern with lots of ease. The bust and hips on the size 6 are 40 inches finished measurement so keep that in mind. That wide width falls from dropped shoulders. This is NOT a fitted top.  I did my usual "petiting of the pattern" as detailed in the tutorial in the right sidebar. I flat measured also, not trusting those pattern measurements, to make sure I had the right amount of width/ease.  I think it is real important to do this with every pattern. Trust nothing. Half the time the measurements aren't what's stated. I decided to do a small FBA anyway. 

Construction:
     Pretty straightforward. The sleeves went into the armhole easily. I installed them flat as the pattern specified. While not spec'd, I decided to topstitch the armscye seams.  All seams are stitched and serge finished. This fabric was very ravelly. I did not turn under the facings. Attention needs to be paid to the where the hem facing meets the side seam. The directions are really clear here so you shouldn't have any problems, just pay close attention.

I also  added the pintucks front and back which I really like and feel it kicked up the top a bit. I go into detail on how I did that in the last post prior to this one. The pintucks were inspired by a crease along the CF & CB folds. It is totally camouflaged now and adds some design interest. Pintucks at the faced hem and over the shoulder.
I got caught up in my picture taking and couldn't resist a seated one in what my hubby calls my "throne" and that despite not fussing with hair or makeup. Why the heck not? Highly recommend this pattern.


Next in the queue--- another white shirt, this one out of seersucker and it's Simplicity 2225.
Happy Easter and Passover everyone! May you all be blessed with a warm, sunny celebration!...Bunny

Reality check, 05/09/13: This blouse has worked out wonderfully. It washes well, is very confortable and I get tons of happies from people when I wear it. I like  the bit of spandex and it is very confortable and versatile. A definite TNT!


Tuesday, March 26, 2013

Cynthia Rowley Meets Chado Ralph Rucci

I''m half way into my next project, Simplicity 2192, A Cynthia Rowley design that's been around a bit and I think it pretty cute.
 
The top is a simple box with a faced curved hem. Boxy things don't always look good on me but I am putting summer comfort first here to get a blouse that will give me tons of wear this summer at work. This is also the first of my White Shirt Binge, with two others all lined up in the queue. 

The fabric is a nice hefty cotton with the usual 3 % lycra. It is the drape and look of a soft aged damask with a sort of reptilian design.

I started cutting the pieces and realized the pressing I did did not take out a crease. What to do? I decide a bit of corded  double needle pintucking would be the solution, very Chado Ralph Rucci.  Simple blouse, simple pintucking, so I ran a straight line of PT down the CF and CB and used my hip curve to radiate two more from the hemline.

First, I lifted my plate to give me access to that wonderful little hole in the needle plate that sits in front of the needle. I passed through a bit of crochet cotton, maybe a size three. Pull out a good length behind the presser foot and replace the plate. In this pic you can see how the cord enters a tiny space between the plate and the machine. 

Double needles are threaded and raring to go!


I ran some painter's tape from top CF to bottom CF and after did the same on the back. I lined my needles up and started with that cord in my left hand for the first few stitches to get it taut into the seam. Then the machine just automatically feeds the cord. I made sure it was pooled in my lap so it could feed smoothly. Since one straight line down the front and back wasn't going to quite make it I took my hip curve and frixion pen and marked lines on either side of CF and CB. 

 They were stitched from the front hemline, over the shoulder, to the back hemline.


My pintucking is complete and the blouse sits on my form. I need to do a bit of fit before proceeding but have serged all the edges inside and am so close to completion. Mo' lata'..........Bunny

Sunday, March 24, 2013

Voguee 8813, Done!

 
At this point I've decided there is a love/hate relationship going on with me and  Marcy Tilton designs. I love them, the way they look, the way they fit and fall, just love them. But getting them to work out of the envelope, according to the envelope just seems to be such a challenge for me. Give me an Issey Miyake any day.  But I will keep on this crazy relationship as she has another dress looming on my horizon. Just bear with my dramas. 

I love this dress. It is comfy, cutesy/different, and just whimsical. Yes, Marcy's designs are whimsical and that's what keeps calling me. Now to the down and dirty. 

Fabric: a double faced  ( two layers connected by threads in the middle) fabric from Joanns. It is 65% rayon, 35% cotton. Dots are on one side and stripes are on the other.  It has that "heavy" drape that rayon knits have which I like. The texture was akin to sewing two layers of thin white Tshirt fabric that have been stuck together and it could be quite unruly. I also thought the completed dress would "stick" to my tights and other clothing but it hung beautifully. I have on just tights in these pics, too lazy to go upstairs and put on my boots.


Pattern:  Vogue 8813.  This is a Marcy Tilton design. There is little fit involved. It has two huge inseam (?) pockets that drape in a really cool way allowing the lining of the pocket to hang out like an applied cuff or edge. Because of the pocket design the hem will never hang straight on this dress. It is cut straight as you'll see when I spread it out but those crazy pockets hang in a way that alters the hemline. I like that, again that whimsical charm. So don't get hung up trying to make an even hem on this one. Just go with it. The dress has a center panel that is gathered over string and tied off and sewn into the edges. Don't do that either, more ahead.

Fit:  No horizontal fit issues were needed to be dealt with. I always do an FBA but the panel in the front of the dress allows you  to adjust  the width, therefore accommodating more or less room as needed for the front bodice area.  I had big issues with this. Because I am five feet tall I did my usual upper chest decrease of a half inch. I did this on all the pieces, sides, panel, and back bodice. This was a half inch shortening of the length of the dress. Then how come my panel hem is about four inches shorter than the rest of the dress? Luckily I was able to even out the hem without cutting into the pocket business, whew!  Sometime being short is a good thing.

Next fit issue was the bust and that gathering. I followed the pattern directions and the perle cotton specified was used. It pulled right out of the seams when I went to attach the panel to the side piece, every single stinkin' row of gathers pulled out. I didn't want to do it that way anyway. I really should have run it through my pleater but felt it was too late in the process for that. So instead I did two rows of machine basting for each row and just pulled. Once I had the gathers where I wanted I just zigzagged over the top of them across the row. It was really secure now. I had to add three more rows of gathering to get the gathers to end in the right spot.

The other fit issue was the hem. I am not sure it's in the right place for me but you can get into those kangaroo pocket if you cut the hem too short. So it is what it is and I'm fine with it. It looks cute with boots.

Construction: I did have some issues, once again, and once again it was in that neckline. It did the same bowing out thing at the bottom of the v neck just like my last MT pattern did, same drafting issue I guess. I finally got the front to lay flat when I tucked part of the panel underneath the collar to take up the slack. I steamed this in and it now layed flat at the bottom of the V neck.

And then there was the v-neck! Because every v neck I have ever sewn has gone down to my navel due to my height I knew I had to adjust the V to be higher up on my chest. I took a half inch out of my panel length to match the rest of the shortened bodice. So I then decided to raise  the neck only one half inch more, all in all only one inch of neckline height gained. Click on the pattern link and see where the neckline ends on the  five foot eleven model. Now see where it ends on my form/me. It's so high up. All dots where checked and rechecked. I had it all matching right. Well I guess I will just have a really high neck. That's OK but I can barely get this thing over my head, really. I really thought I maybe missed a back neck facing or something.

Other peaves: In step seven it has you " Pin upper side front to pocket facing, matching symbols... yada yada. " It says " pocket will not lay flat". It sure lays flat in the picture so what does that mean? Doing that pocket is really tricky and I just winged it with my sewist's intuition and it came out. I do love how the edge hangs out on the pocket and think it is just brilliant.

All in all, this is not for the faint of heart, in my opinion, but it is a really cute design, very comfortable to wear, just fun. Doubtful I will make another as it is too distinctive but I am itching to start my next MT dress. It's just gotta be easier. Third times the charm!

**********************************************************************************


This young lady was in my back yard this morning with her three girlfriends. She loved chewing on my yew until I shooed her away. This is Spring in the Adirondacks and I can't wait till it's over and green grass and sunny skies greet me when I look out our windows. What a long winter! ( the reason the turleneck is under my new dress!)

*******************************************

Thank you, all of you, for your warm thoughts regarding my hubby and my frustration with the spam. Your comments are always treasured. Thank you..............Bunny

ETA, 05/24/2013, REALITY CHECK:  I have worn this dress several times. I figured it would be comfy and great for travel so have worn it a couple of times to visit my daughters in New England. MISTAKE! They have dubbed it my "frumpy dress" and say it does nothing for me and I look better in a lot of other clothing that I own, unquote! Since one's daughter's are usually one's best fashion critics I have to give this some serious consideration. No one wants their mom to leave the house looking worse than they should. So my cute little French Housewife's Dress will stay just that, something she should wear and not me, unless it is a rainy day and I am not leaving the house. Reality? I think my children don't want to see me age. They don't want me to go grey either,,,,,Bunny

Saturday, March 23, 2013

I've Had It!!!


OK, I am dealing with an ill hubby, a quite ill hubby, and his situation is very time consuming. I also work full time. I also have this passion called sewing that keeps my sanity. AND TODAY I HAD TO SPEND AN HOUR CLEANING UP THE SMUT ON MY BLOG.

In my rage I've decided to nix anonymous comments. All the crap was posted anonymously. I am so sorry about this though as I know many of you post anonymously and politely leave your name in your comments. But I just don't have the time to do this housecleaning right now like I have in the past. I really appreciate your understanding.

Now, if you don't have a blog but still want to post your comments you can sign up for a blog and just never do anything with it., no commitment. It will give you access to all the blogs on blogger no problem and there will be no need to post anonymously. I am really sorry for this change as I value each and every one of you and so enjoy all your commentary which sometimes is brilliant, other times pithy, and even other  times hilarious.

Thank you so much for your understanding. Back to sewing in the next post.......Bunny

Friday, March 22, 2013

Pattern Prep, Newbie Alert!

 This is my next project, making the first of I hope several shirts, most of which will be white. While this may not be the most inspiring blogpost, it occurred to me, while starting this new project, that pattern prep IS important and it was years of sewing before I figured out how to do it right. I would like to save our newbie sewists that time and opportunity for error. It's one of the things no one ever really showed me and it was far too simple to be part of any discussion. Here is how I go about it. This is a  shirt pattern, a sorely needed basic in my wardrobe and here is how I prepped  my pattern.


Once I have decided on the view I will I measure the width of the fabric from selvedge to selvedge. I circle that pattern layout on my instruction sheet with a marker to prevent my eyes from needlessly wandering the sheet for the "right one"  as well as to prevent mistakes. Be aware that some markers will leach thru to the other side of the pattern sheet so test your marker out on the margin first.

I find it also really helpful to check of the sequence as so many patterns "jump around" from step to step all over the pattern instructions. I hate having to seek out the correct order of things when I really would rather be sewing.

After that, a bit of time in front of the TV with my "paper" scissors and  I do  a rough cut of the necessary pattern pieces, checking my layout as I go. Still looking sort of messy, right? Double check that you have all the pieces necessary.


For years, in my ignorance, I just smoothed them out and proceeded to cut the pattern and fabric out at this point. NO! It is off to the ironing board to IRON THEM FLAT. Patterns get the most amazing skinny wrinkles that stubbornly won't smooth out any other way. An 1/8th of an inch here, an 1/8th of an inch there, and fit inaccuracies set in. Trust me, it all adds up. If you have wrinkle discrepancies, then cutting discrepancies, then fit discrepancies, well, you can see where this is headed. Oh, NO STEAM from your iron ! It will shrink your tissue, more discrepancies. Use a low dry heat and get those pieces perfectly flat. See those micro wrinkle? They are flat now but you see their "residue".

Once all pattern pieces are ironed smooth, cut them out now on the black cutting line.Yes, I cut off this line, more discrepancy potential. Years ago these lines were much thicker and it was important to rid the pattern of their presence. Today it is clear the cost of ink is in play so the lines are much thinner. Either way, cut them off as best you can. Another reason to rotary cut! Oh, if you decide to not do this step, I can pretty much guarantee inaccuracy as you try to cut through your fabric layers and your pattern tissue at the same time. With a rotary cutter that habit will do a hatchet job on the pattern tissue, making it a mess to reuse again. With scissors it helps  you get a nice even cut.


 Doesn't this look sweet and ready to go?

Now it is to the cutting table or whatever you use to make your adjustments for fit. Using scotch tape will prevent you from re ironing the pattern on the next go round as it will result in a hot gooey mess and wrinkled pattern when ironed so use pink hair tape, a fave, cloth bandage tape, or better yet, actual pattern tape which you can get from places like Nancy's Notions.

ETA: I have learned to now use strips of leftover fusible interfacing to make fit adjustments to my patterns. I use the strips jist like tape but then iron them on. It makes the pattern much easier to prep the next time around.

Adjustments all made? Now you are ready to cut!! And remember, when your garment is all finished and it's time to squeeze all those pieces back into the envelope, read Pattern Folding 101 to make it easy on yourself and your pattern. Yahoo and happy sewing!

ETA 3/23/13: Make sure you read the comments. There are some additional great tips from our faithful readers. Thanks, FRs. 
*********************************************************************

I have finished my Marcy Tilton dress and positively love it. Life has been hectic with hubby's needs and that's OK but I won't have pics till probably this weekend, pics and the down and dirty on my love/hate relationship with MT patterns. This was not the most earth shaking post but one that would have definitely helped me early in my sewing life and I hope it helps you a bit. As always, there is more than one way to handle a process so feel free to add your two pennies on the subject. I hope I have helped a few newbies. I love newbie questions and comments.  More to come soon!...Bunny


Monday, March 11, 2013

The Planet Earth Koos bag is complete! Vogue 1311


Planet Earth is done! It has sat around for two plus weeks just waiting for me to hand stitch the lining in. Much has been happening on the home front and I literally have not had a moment to sew or much else until this weekend. My hubby fell and became bedridden with his injury. He is now improving slowly which has allowed me to get into my cave this weekend for the first time in a while. Talk about needing some sewing therapy! It was just the thing to get me my mojo back! As he improves I will be able to blog and sew more, so please bear with any absence on the blog front. Thanks.

I love this bag.  It consists of various fabrics and trims. I used some hand dyed wools and rayons, some upholstery trims and some fancy machine stitches. The colors will work well with my wardrobe. It is one big honkin' bag and I may just save for overnights. I lined it with a polka dot quilt cotton and put numerous pockets around the band of the lining, none of which are easy to see but I think your imagination will work here. Hope you like!


**********************************************************************

I am halfway through a new project that will use this double faced 65 rayon, 35 cotton. It has a wonderful drape, thank you Mr. Rayon, and I think will be perfect for the pattern. Would you believe I found this puppy at JoAnnes? You just gotta be lucky in there sometimes!

The pattern is Vogue 8813,  a Marcy Tilton design. I know, I swore would never touch another of her designs but this one sucked me in. There is minimal fit involved and the elasticized panel in the center front can be utilized for adjusting the fit easily. I think it will be a cute little number for work and very comfortable to wear. I think it will look cute with a black turtleneck underneath too. This goes together quickly and the most time consuming aspect was carefully cutting so I had the correct pattern on the correct piece. I think I have them all sorted out properly. 

The big kangaroo pockets go together very uniquely with the top side panels. I am not past pocket number two yet but I think I got it right. The pattern does not require any stay tape in the shoulder seams but I put some in anyway. I used selvedges I cut from quilting cottons. They work great and I have a jar full at the ready all the time. If I have success with this MT design I am ready for another, her latest dress for Vogue, 8876, which I absolutely love. I see this in either a batik cotton or a lightweight denim and think it will be perfect for summer. Whatcha think about her new designs?...Bunny


Had to Refurbish This One!

    About  6 or 7 years ago , during the dawn of the Zipper Trend,  I bought one of my rare retail items. It was a blush pink and black bord...