Sewing Vloggers

Thursday, July 31, 2014

Help! I need help with a project

I mentioned in a previous post that I am making  a full length dress for a friend for a wedding. She will be a bridesmaid and has been instructed to wear whatever she wants but it must be "baby blue". Since she was having no luck at all with local retailers and neither of us saw anything appropriate on line  for a 52 year old bridesmaid , albeit a very attractive one, I offered to make her dress.


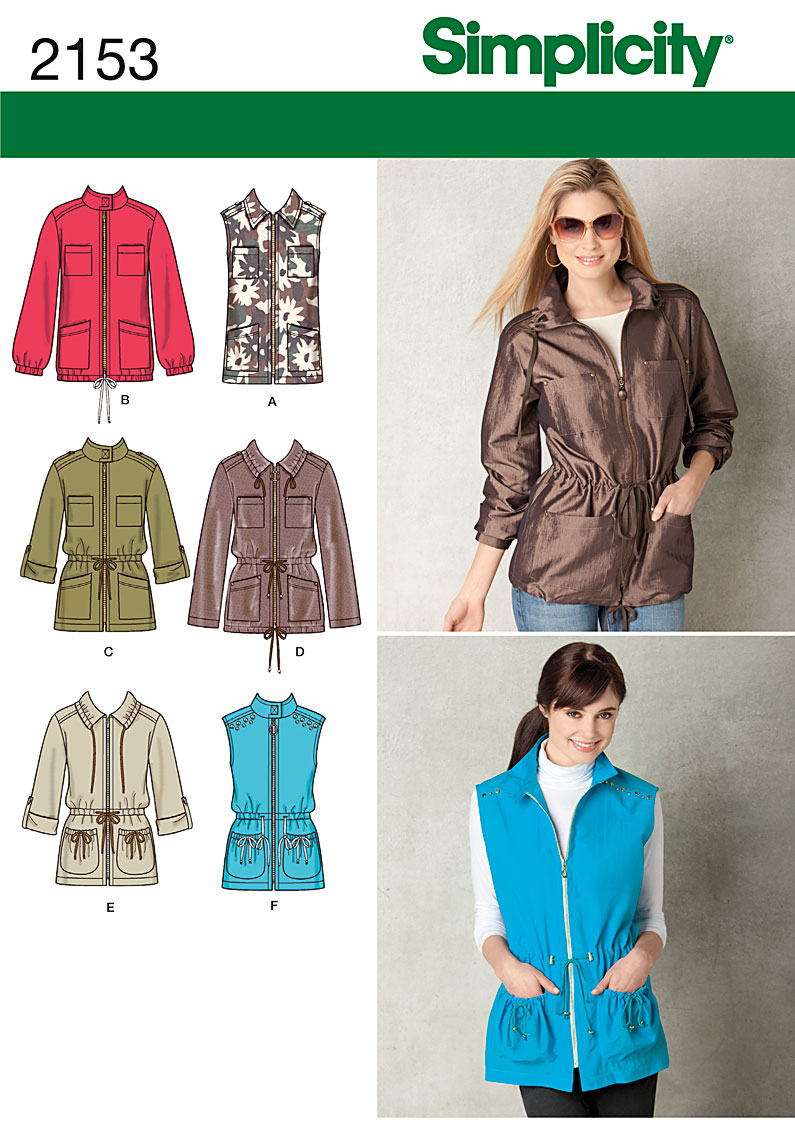
We will be making McCalls 6612, View B (the pink one) with a flutter sleeve and floor length skirt. The cowl is less pronounced on this view. The fabric is a sky blue (much more flattering color) rayon knit. Since it is a bit thin  and could use some beefing up, it will be lined. I also think the lining will fall a bit more gracefully in the cowl area if it is lined.  I wanted to buy lining in person so I could make sure it didn't "stick" to the fashion knit. I hit my only option, Joanns,  and actually did really well with a "swimsuit lining knit". It didn't stick, had the same stretch factor and we are good to go. Here's my dilemma - do I do this as an underlining, treat both pieces as one or do I do it as a lining, connected only at the neck and armscye?

The dress is floor length, has a slit to the knee on one side, a cowl neckline, and I think flutter sleeves at this point. I am very worried that if I treat it as a single unit, the fabrics will shift and show wrinkles or pull at the seams somehow, although it hasn't done that with my sampling with it. The biggest issue is the slit. The lining is white. I don't want it flipping out when legs are crossed, etc. I am thinking of a blue stretch lace along the lining edges of the slit which I'll cut back, that is if I use a free hanging lining.  What do you think? Any and all suggestions are welcome.

We've been through two muslins and the fit is looking lovely. I have to say the neckline is really really pretty on her and we are both so pleased with that. It was a pisser to get the fit right and adjust the cowl.  So this weekend I will cut apart the muslin and get sewing. I just need some voices of experience with knit linings. The stretch factors and weights are the same.  You all know my knit experience is not deep so thanks for any help offered............Bunny

ETA: I just thought if I do as an underlining I can do a blue lace strip, mitered at the top, all around the slit on the lining. So if  anything peeks out it will be the pretty blue lace. Hmmmm,,,,,, just thinking but hope to hear your thoughts. Thanks,,,,,Bunny


Wednesday, July 30, 2014

Hard core Normcore?

You may have figured out I am trying to open discussion on some of the fashion trends we are seeing today. I love fashion and love to read about it. I cruise all the newspapers I get at work for each morsel. I sometimes find it all shallow, sometimes very provocative and sometimes what the heck. But I like it all and hope you don't mind my sharing these thoughts with you, dear readers.

Yesterdays' conversation was really interesting and I really want to thank all who commented and the way they thoughtfully handled opposing points of view. Whenever I see conversations like that I learn so much and feel better informed. Thank you for that too.

The next fashion trend that I have been reading about a lot is "normcore". The first time I heard the term I was mystified. As I read and learned more I began to realize this is no trend and has existed for years on the American fashion landscape. I mean, how old is that picture of Jerry and the gang? 

From what I have read and seen "normcore" is , from my vista, being as unobtrusive as possible with your fashion "look". It's a blending in with the mob. And personally I think it is pretty boring.  Think Mark Zuckerberg and his never absent hoodies, the late Steve Jobs and the black  turtlenecks. It's people in old jeans, old sneakers, hoodies, and what I would even go so far as to call Dad Jeans. There is lots of grey so the clothes just sort of fade into the woodwork.  They are don't notice me clothes. This is a trend? Maybe for the rich and famous who traditionally leaned more toward couture level garments.  For them this could be a change of style but for the rest of us plebes this style of dress has been around a  loooooooong  time. Think of any college campus you have been to in the last, yikes, fifty plus years. Heck, those campuses were the embryos of the normcore look. 

Vogue News has a great article about normcore which really sums it up like this, "in fashion terms, normcore is all about anonymous, detail free design".  Doesn't sound like much fun sewing that! Actually, this is a real non sewing look, unless you make your own sweatshirts, white tees, and faded  baggy jeans. Where are the bound buttonholes, the bright digital prints, the 20 piece sheath patterns, the stuff sewing addicts enjoy? 


True, an anorak like the jacket above can be a real challenge to make but give me some color, embellishment, or pattern to wake the dang thing up. I guess we get to match plaids in flannel shirts too. That requires skill but wear a neat scarf, hike up that collar, give that shirt some panache. It can be done. But then it wouldn't be normcore. 

What I like about normcore: it is comfy if nothing else. It appears to use tried and true quality garments, those backbone pieces that we just have to own. Take the normcore out of our closets and they will probably be half empty. I think we all have a sub wardrobe of normcore garments. We just accessorize them and give them less ambiguity but they are there. 

What I don't like about normcore: It's been done forever and really not a trend for most of us. It's BORING. I really don't like boring clothes. I don't like sewing them or wearing them. And to be a true normcorist these basics are out of cashmere, fine woolens, Japanese denims, all top quality textiles. Hmmmm, maybe I should put that one into the What I like paragraph. 


Even those Olsen girls are going Normcore. I do love the shoes and white socks. That took a lot of courage or some very cold feet. Nah, still not for me......except maybe on Fridays when I put the trash out. 

Do you agree with me that this is nothing new, pretty boring, and will probably be around forever? That this may just be  a new look for those who could dress much more expensively and with more style? My tired inquisitive mind wants to know........Bunny

Tuesday, July 29, 2014

Twee and Trending

I have discovered Twee. I am probably behind the eight ball on this trend but thought I would share with you. What is Twee?

Per Miriam Webster Dictionary:   ":  affectedly or excessively dainty, delicate, cute, or quaint"
                                            Origin: baby-talk alteration of sweet
                                             First Known Use: 1905

So the word is not new and you can whip it out at the next round of Scrabble play. From my research, and I am not working on my thesis, Twee is a cultural phenomenon as well as a fashion trend. You can read all about the cultural side of  Twee with a Google search that will bring articles from Salon and Harper's and others. You can also google Twee fashion images and get an idea of the trend. I've seen this trend on numerous sewing blogs. What I see repeating are defined waistlines (love), short gathered skirts (that ship has sailed), oversized Peter Pan collars ( like a lot), round toed Mary Jane shoes (comfy). Hair is almost always adorned with a flower, bow, or hat, the more three year old cutesy the better (too much). Skirts are short (fine), lots of hose (warm) and a specific posture. No, you don't stand a certain way if you are Twee, that is unless you are a Twee blogger. 
Twee Bloggers are an interesting bunch and they love to take pics, lots of pics, of their Twee outfits. The poses are quite reminiscent of a very young girl child showing off her new Sunday best. Hands hold out the gathered skirts so you can see the full twirl potential. Toes are pointed in the way someone who is wearing high heels for the first time might and heads are tilted to best display the aforementioned hair ornament.  Accessories and jewelry are very Hello Kitty. It is all very cute, very second grade cute.   

This trend is clearly not for those with a treasure of life experience in their personal bank. Not because we can't pull off the look, which I am pretty sure we can't, but because we were the ones who wore those navy blue suits fighting against and alongside the men we worked with to get equal consideration, respect, and opportunity. We needed  to look grown up, and equal to anyone we were dealing with in our careers. Looking like cute little girls going on a playdate did not equal dressing for successing. While we all know this country is pretty doggone sloppily dressed today, are we moving into a era when being taken seriously in the workplace isn't a goal anymore? Are we still trying to convince ourselves that appearance or first impression  makes no difference in the workplace or anywhere else? We all know otherwise. Can you picture Sheryl Sandberg, Martha Stewart, Meg Whitman, and Carly Fiorina being interviewed on Bloomberg with their bows and silk flowers in their hair? Who needs a good strong handshake when  you can twirl your skirts for an introduction? It just all seems such a dichotomy. I just had to get this off my chest. 

Here's what I think. Lots of this Twee is really pretty. Some of it is just too far gone childish, sort of like baby talk fashion. I dislike how it is stylized in photos, almost making models look like girlish victims. That's not good for any and all women. 
Here are some links to Twee type bloggers. Check them out and please let me know what you think of the fashion trend. This post is about the trend and the fashion, not the blogger.  

This first blogger has a style blog in Nashville. I think she is gorgeous and I like her version of twee, not so childish. Twee in the Garden
Twee does have a retro undercurrent as these two blogs and many others show. Scathingly Brilliant and Finch and Fawn
A tongue in cheek post on how to be Twee. How to be Twee

You can find much more by googling images of Twee or searching Twee on Pinterest. You will stumble across the look in some sewing blogs like See Kate Sew
My tongue is a bit in my cheek for this blogpost as well. I would love to hear your thoughts. This is just one trend out in the fashion world right now. There are numerous others. Be kind and tell everyone what  you think. Oh, and get ready for "Normcore" ;).....Bunny


Sunday, July 27, 2014

I love Ikats!


I have always loved ikat patterns with their bold geometrics and dry brushed paint appeal. You can see lots here: Ikat images . These designs have been around for ages and while I haven't done any research lately other than shop for them, I remember something about them originally being hand woven by maybe Guatemalans or Bolivians. I have to look into that.


For some time I have wanted to make a summer jacket. Around here you still get 40-50 degree nights and 80-90 degree days so a good light jacket is necessary. I was really needy in that department. Last fall I entered the Threads Fall Jacket Challenge and the jacket that I  made for the contest is the same design I will be using for this jacket. It is Simplicity 2153.  It's a classic anorak and a very versatile.


 One of the really wonderful things about blogging is having a journal of your work. I knew I also wanted to flatline this jacket as I did on the original. This pattern also has all sorts of details like grommets and casings, yokes, etc. and it is great to have the resource of the previous post to refer back to.


Since I am still getting over my recent pattern matching fail I paid particular attention to what was going on with this design. The first thing I did was establish my bust point so I wouldn't have the ikats landing on my real estate in an awkward fashion. Then I set about cutting the first piece, the front bodice. All pieces were cut in singular layers. 

Once the first piece was cut, I laid it on top of the fabric, matching the design. Then I cut the second piece out using the first bodice as my pattern.

Now to match the side seams, NO! I got them perfectly matched and realized that I paid no attention to where the design laid out on the back bodice. It was then I realized that with a large motif like this you need to establish the lay of design on any pattern piece before attempting to match. In other words, I took the back bodice pattern piece and laid it out so the hemline area lined up with the front and the ikat was centered on my back, not off balance. Then the side seams were matched on the vertical as a perfect match on the horizontal would leave the motifs off balance on the back bodice. You have to make decisions with each piece on how to match. It's not always black and white, at least at first glance. When I got to the sleeves it was the same. I needed to establish the center of the column of ikats in line with the center of the sleeve where it starts at the shoulder seam. After that I proceeded to match the sleeve with the bodice. Whew, lots of words, lots of concentration but  think I did it ok this time. At this point all is cut out and ready to go.

A word about the fabric. It is a definite home dec print and I absolutely love it. I was looking for something with a blue jean coloration and when it arrived it looked even more so than it did online. I got it from Fabric.com, 22.99 a yard so not one of their bargains. It is really nice quality, for sure. I did serge the edges and machine wash and line dried it. The fabric softened nicely but still has that heavy linen look. I think with the flat lining it will work up to just the right weight.

I am going to "unit sew" this garment as much as I can. I like sewing that way, particularly on garments with varying details like this one.

I am still working on my friend's gown. I did a second muslin, which I think will be good and she will try that on this week. I sure hope this comes out nice.  My beading is continuing as well and I am such a feeble beginner, but I am determined. When I have something to show I will....Bunny


Sunday, July 20, 2014

Beads and Bezels


I have had more fun the past couple of weeks playing with beads. I am trying to teach myself some beading stitches and techniques and at the moment beading a bezel has my attention.

Not much personal  sewing has been happening here since the jeans completion. And if you are a creative type, you know lots of things are asking you to create with them. They sit in the back of your mind fermenting, while you sew, into some overflowing brew that just has to be dealt with. For the past 6 months, for myself, that has been beading and dyeing. Off and on over the years I have dabbled in jewelry making and always enjoyed it. True, I always go back to my first love, sewing, but I think it is good to wake up the creative senses with a bit of variety.
\

What you see here are cabochons, aka, "cabs", that I made this weekend and it was such fun. This is what happens when you mix a bag of dollar store glass blobs, some large flaky glitter and all sorts of nail polish. Each one was done individually and I  just didn't know how these would turn out at all. Some of them I am really pleased with.

I definitely have my favorites and will show a few. Love the opal effect of the one above.  And the black and orange of the one below really calls out to me.

And I love the multi colored black opal effect of the this one below. What to do with them all? My goal is to bead them all around, what is called a bezel,  and then attach them to some sort of jewelry. This is a project left totally up to creative flow, and that is just so much fun. I think every now and then we need to just play with color, texture and form in a highly unstructured way. I more than likely won't bead every cab you see but the project will have served it purpose to renew my creativity and that is so important. 


I have had a sewing project going on. I gladly agreed to make a long dress for a bridesmaid. Huh? She is a good friend, one who definitely understands and appreciates my work and was really in a bind. She is 52 and was asked to be a bridesmaid in a second wedding. The bride has instructed all four bridesmaids to wear long "baby blue" dresses of their choice. Do you have any idea what it is like to find a long, baby blue bridesmaid's dress for a 52 year old? She has spent so much time looking and nothing seemed appropriate or attractive. My feeling sorry for her teamed up with her desperation and here I gladly am. At this point we have fitted the muslin and now I will adjust the pattern and cut out. I found a sky blue knit that will be made up into a simple column with a cowl neck and not sure what sort of sleeves yet. I am going to see how it looks before deciding on sleeves. The dress will be lined. I should have this done before the deadline at the end of August no  problem. We are trying to think of ways to embellish the dress so it won't be so plain. Her attitude is "just get me through this" and I hope to, at least with a bit of style. So that is sewing that's happening here. In the meantime beads  keep entertaining me and contributing a lot to my sanity level and creative lust.....Bunny

Saturday, July 19, 2014

An Experiment...are you game?


I thought I would give something a shot. It may or may not work but I am game. It's here for you if you are game. In the sewing blogosphere certain themes appear to repeat themselves. Certain topics have been an issue since the beginning of sewing blogs and still are. One of the quandaries I see over and over is the question of do you tell someone if you know an easier, "better", faster technique to accomplish something in the sewing world. Can you tell them with kindness and best intentions and does that make it OK? Inevitably when this discussion comes up the majority say they have no problem with being told how to do something differently. But in reality, when I have seen it done, panties can get in a bunch and do. There are those who do not like to be told in public on their blog if something can be done differently, better, or more easily. And you know what? THAT'S OK! I respect that all the way. It's your blog and you can control it how you would like. It is totally OK with me and probably OK with most folks if you feel that way.

This has been bugging the heck out of me. How can we know who is open to friendly critique or instruction and who isn't. I don't think anyone wants to hurt anyone's feelings. I sure don't. Then the light came on, A BADGE. So I messed with some photos and font and built myself a badge and will post it in the sidebar.

It means that if I am doing something one way and you know how to do it a "better" way for my situation, you can feel free to offer kind, positive critique of technique. And I do stress the kind, positive here. I will not tolerate any who think this is an opening to be negative and nasty. I would love to know easier, or more professional, or quicker, or cheaper, or whatever ways to do things in my sewing. I am always open to learning. If you are a kindred spirit, I have the grab code under the widget in the sidebar. You are welcome to grab it, use the badge and give this a try along with me.

I don't know if it will work or not. Time will tell. But the badge is yours for the grabbing. Just please let me know how it works out for you . I would really appreciate it. Fingers crossed here...it's a brave new sewing world out there.........Bunny

Wednesday, July 16, 2014

Everything Old is New Again


Would you just look at this book cover? Isn't it a hoot?

If you have ever searched a sewing book on Amazon you know that at the bottom of the page are thumbnails suggesting other books you may like. Often these are way off the mark but other times these thumbnails make me aware of sewing books I  have never heard of. I then use those suggestions to order these books through my library. This one, The Illustrated Hassle Free Make Your Own Clothes Book by Joan Wiener and Sharon Rosenberg just came in through my inter library loan service.

Why would I review a sewing book from 1970? Mostly because it is positively hilarious. But I also have a point to make here. The book review:

I lived through this era. It was my teens and early twenties. It was the age of Aquarius, Woodstock, Janice Joplin and Jimi Hendrix. Gotta love the music! During this time I was sewing my brains out, prom gowns, winter coats, jackets and even my wedding gown. But while I was occasionally  attempting to sew a Vogue Couturier pattern ( loved Jean Patou), and I do mean attempt, others had a free-er, less inhibited approach to sewing and pattern making. Sound familiar and contemporary? Oh, yeah, I embroidered my jeans, wore Jessica McClintock hippie dresses and even sported those embarrassing bell bottoms. I see the slightest bell shapes to jeans today and I run like the world behind me is on fire. They didn't look good then and they don't look good now. But when you are young and impressionable you go with the flow. Peer pressure maybe? AC-DC? There is actually an entire chapter on "AC-DC" clothing. Huh?

                                                     Jessica McClintock Gunne Sax dress that was just like the one I had. So virginal! Mine was pink.

I can't tell you how funny and enjoyable I found this book. Let me pass along a few quotes for you. From the jacket blurb: "Men, Women, Brothers and Sisters, AC-DC, boys and girls, little kids, grannies and Aunt Lil too (you've been doing it wrong for years)-listen. There's no need to lock yourselves into fickle friends of transient and exploitive plastic fashions. WEAR WHAT YOU WANT! ...MAKE YOUR OWN CLOTHES! No kidding: inexpensive, comfortable, groovy to wear, simple to do for humans of all age, size sex and affiliation."  These sentences just reek Sixties and the lack of political correctness is refreshing. In the sixties it was "hassle free" and in the '010s it's "improvisational sewing".

More: "We don't use darts on tops because we don't use bras - they give your clothes a funny shape." Not sure if they mean the bra, the darts or both!

"What  this book won't help you do is make clothing that has stuff like darts." Today's version, " this book won't help you make clothes that fit".

What the book does is dis machine sewing but eventually acknowledges it goes faster so why not? I saw this exact same introduction to a contemporary book that came out some months back. It also dissed the machine, called it intimidating and unnecessary. And patterns? Both the old and new books  thought they were overwhelming and totally unnecessary. Seems the rejection of traditional sewing is far from a new creative vision when it comes to selling sewing books.

Here is a page from the book showing how to tie a tee shirt into something a bit more provocative:

And before Pinterest, no less! And here is a page from the book, "99 ways to cut, sew, trim & tie your t-shirt" by the Compai lifestyle bloggers:

Not much different!

So I am not actually reviewing these books. I wouldn't have either in my sewing library. I will say that the "hippie" book does offer some good information on hand stitching and using RTW garments to copy for patterns. While the technique may not be Kenneth King's it will get you there in a rougher sort of way. If you lived through the sixties, you will get a big kick out of reading it. It does document an interesting era of American history and the fashion worn at that time. And the tee shirt book, well you can only cut so much out of a tee shirt before it starts getting a bit slutty and by the time you get to #99 there some pretty slutty fashion happening. If you are into "festival" clothing, aka "hippie rehash", you  might get a kick out of that one. Just know these books are in your libraries and you don't have to actually spend money to get them. Read them for the fun of it, not out of any expectation of inspiration or excellence....Bunny

Saturday, July 12, 2014

Jeans (?) done!


The jeans (?) are done! First, a big thank you to my husband who took all sorts of hair done, made up face, look at me photos. Unfortunately the pants outside just seemed to disappear into the dark foliage, grey sky, I don't know. So I took more photos, bad hair, no makeup, down in the family room but you can see the pants a lot better. The reason there is a question mark is that these have all the jeans details but not quite the fit. More in a minute on that. 

Some deets:

Pattern:
I used  my Sure Fit Designs sloper along with their Jeans DVD that I purchased in addition to the pants  kit. Glenda's instructions were to take it down a size, which I did, and to cut back the leg width. I have some deep dark emotional issue when it comes to cutting into patterns the way my gut tells me too. I thought the legs looked to wide so I took an additional inch out of each one but I feel there is still too much volume for a pair of jeans. Nice pants, but not a jeans fit. That's OK I still really like these. I have since tried on numerous jeans of mine and have picked out the pair to copy on the next go round. I don't fault Sure Fit as Glenda says she likes her jeans more like trousers and did recommend cutting them back more in the leg if desired. I just was not quite sure what would work for me and I feel it shows. 

I did use Sandra Betzina's Power Sewing to aid in the fly zipper and construction sequence and that was a big help. I also used her method for a pants stay across the tummy and that was described in previous posts. 

Fabric:
This is 97% cotton, 3% lycra from Joanns. I really liked the print. I will not make the next pair with any lycra at all. I am all ready with my 100% cotton denim. I swear these pants stretched out just working on them. They do feel very comfortable. I do not like lycra! I'd rather be uncomfortable than baggy, vain woman that I am!

The stay and pocket lining are a "railroad engineer" looking cotton. Remember those striped Oshkosh Begosh coveralls on your kids? That fabric! 

I used rivets from Taylortailor and they worked great. I like that you can buy small amounts from them. None of them broke or gave me grief. There are several youtube videos for attaching the rivets that were very informative. I learned a lot from them and recommend checking them out. Just search "jeans rivets".  I did not do rivets on the back pockets as they are known to rip and scratch leather upholstery. 

Construction:


Construction was pretty straightforward with the addition of lots of topstitching and the rivet installations. Here you can see the fly. It is so easy to do using Betzina's method. I did not do a fly shield this time. I just wasnt' sure about the bulk but I think in my "real" jeans to come, I will have that shield. 

For the topstitching I used regular Gutermann thread and the "triple stitch" on my machine. This is the stitch that goes back and forth three times making the stitch and before it moves to the next stitch. I think it is more difficult to control than a regular straight stitch but I do like the heaviness of it all. I think I may use jean topstitching thread and a single stitch  for the upcoming denim pair. 


I did a lot of snoop shopping on jeans before I made these. There are many, many variations in the way the topstitching and riveting is done. Consistent in most jeans I checked out was to double topstitch the full inseam from ankle to ankle. On the side seam, the topstitching was done only to the end of the stay/pocket bag and then finished with a bar tack like you see above. Works for me! I wasn't about to try to topstitch a side seam on a closed up pant leg. 

The topstitching thread I used was a perfect match to the deep pink but  the flash makes it look a lot lighter. Not so!

I did my best to work with the pattern of the fabric and think it looks pretty good. It was unmatchable so I just tried to keep the positive and negative areas next to each other and I think it looks fine. 

Also in my snoop shopping was a lot of looking at pocket placement and shape. The Sure Fit sloper gives a patch pocket for jeans but I did not use it. I found the most flattering pocket on my ample hips was one that was a half inch less wide at the bottom than the top. It also needed to slant out slightly at the top. You can see that the top corner of the pocket is higher at CB than at the side toward the side seam. I found a lot of jeans like that and found they were the most flattering for me. Different hips will certainly work differently with their pocket alignment. . 

In the end, I think volume needs to come out of the area from the thigh to the ankle on my next pair. The rivets and topstitching details that were intimidating me now are old friends and I am ready to skate right through that on the next pair. I am ready for my first official pair of denims! Whoo hoo!........Bunny


Saturday, July 5, 2014

Jeans, nearly done!

Keep in mind this is the very first time I have ever attempted jeans with all the bells and whistles so all is new to me. As I usually do, a lot of time has been spent in research. My "muslin" jeans are looking pretty good but we will see what the final finish brings. I'll share a few things I've learned.


I used some Frog Tape to make a template for topstitching the zip. I just stuck it to my cutting mat and cut it to the right size with the rotary cutter. Then I just pulled it up and stuck it on the pants. It made the topstitching more precise and also made sure that I cleared the plastic on the zipper end. You could use any painter's tape. As I always do, the zip is longer than needed. Why go around that lumpy bumpy zipper pull when you can just have it out of the way with a longer zipper?


Then came the rivets! There are a bunch of Youtube videos on how to put the rivets in your jeans and I learned a lot from these. What would we do without youtube videos?  Just search jeans rivets and they will come up. I did learn why the rivets fell out of a project I did a few years ago! I needed fabric "washers" !
Jeans rivets consist of a disc with a post and a decorative disc with a nipple. You will put the post part through the fabric on the wrong side and then hammer it into the nipple rivet on the right side. These pics should make it a little more clear.


For supplies you need a hammer with a very smooth head otherwise it will mar the surface of your post disc. A smooth metal plate of some sort helps. I tried using a 3/4 inch thick piece of maple but it was not hard enough, so find some sort of hard metal surface for your banging. Also needed is some sort of pointed poking type of object. On my old failed project I used an eyelet cutter to make a hole for the post. Bad! You don't want to use anything to make your post hole that will cut the fibers. You want to poke something through that will push the fibers to the side and not cut them. I started with a seam ripper and then switched to my trust dental tool, perfect! A hole will need to be punched in the actual jeans spot where the rivet will go as well as in the fabric "washers".  Say "Ahhhh".


If the fabric is not thick enough as in maybe four layers of denim (per one video) you need to build it up with layers of fabric and make a fabric "washer"  to go between the lining and the post. Failure to do this is what makes the post too long and causes it to break. So I cut these little squares of layers of fabric and used them between the lining and the rivet post. The rivet post goes through everything and on the right side of the jeans you place the nipple disc in the point of the rivet post, you know, that male/female thing. While holding on to the whole thing turn it over so the nipple is face down on that metal plate. Give a few not too crazy hard bangs with the hammer. Trim the edges back to the circle shape and it should be done. Again, this is my first attempt at jeans rivets and just what I learned from you tube. Hopefully it will help others out there. I could not find  non youtube resources on this technique and appreciate any input my dear readers have to offer. This is a new journey I am on.


I got my rivets from a place called Taylortailor.com . They have great instructions on installation and sell in small amounts. 

Then it was on to the pockets, again, this is all a first time for me. I do hope the next pair, real denim, will be a smoother, quicker make. Back to the pockets: It took three sets before I got it right or at least as right as anything can be the first time you do it. My first pair of back pockets, well, I forgot the seam allowances. My second pair I used a satin stitch for the design and because I did not use a stabilizer and the fact that the fabric had lycra, the design was a wavy nasty thing that just ruined the pockets. I mean, we sew real here but three times the charm! I copied the size and shape and placement of pockets on an existing pair of jeans that I own. Since the satin stitch did not work the design would be made using the same triple topstitch that I have used all along with some tear away paper stabilizer,  no regrets. 


Here you see the pocket on top of a piece of typing paper for stabilization. That helped immensely. It all ripped off pretty easily.  After the design was stitched the angles were mitered and SAs pressed to the back. Finally, after three attempts I was able to install the pockets on the jeans. I used the same triple stitch for topstitching them and did a bar tack at the corner. I had planned on a rivet at each corner but one video I saw made the point that rivets on back pockets are really good at ruining leather uppholstery, whether in your car or at home. Since we have both, that was the end of that idea! 

The waist band needs installing and then hopefully a bit of modeling and pics. This always requires a bit of  "let's make a deal" with my personal version of Richard Avedon. Maybe a good meal? ...Bunny


Wednesday, July 2, 2014

Part Two - Sewing the Pants Stay

Welcome back to part two, the actual sewing of the stay. I want to say that if you have a pants pattern that has pockets in front with an under pocket lining and an upper pocket lining your pattern may be as simple as just extending it out to the edge of the fly. Hopefully that will save you a bit of time and effort. In my case, I drafted the sloper so had to make it all from scratch, which you certainly could do with a pattern as well.


First, cut the seam allowance edge of the pocket on the Upper Pocket Lining.


With the pants leg facing up. Place your Upper Pocket Lining on the pants, smoothing out and matching edges. pin the edge of the pocket opening down. That is the area with the quarter inch seam allowance. 


Stitch on the 1/4 inch seam allowance and then trim off the excess as shown.


From the right side press the Upper Pocket Lining away from the pant leg.


Turn the Upper Pocket Lining to the wrong side and leave about a sixteenth of an inch of the fashion fabric showing at the edge. Press well. Pin into place.

I put some Stitch and Ditch paper stabilizer underneath and then proceeded to topstitch the pocket edge with a double row of "triple stitch". That's the stitch that goes back and forth three times to give a heavy topstitch with regular thread. Make samples and play with the tension to get it right before doing the actual pocket edge.


Serge or pink the bottom curved edge of the fashion fabric Pocket Facing. Pin the Pocket Facings to the non fly edge of the Under Pocket Facing. Stitched this curved edge down to the Under Pocket Facing. 


With the pants now wrong side up, pin the Under Pocket Lining with it's corner Pocket Facing face down to the Upper Pocket Lining. I think the picture above makes it a little clearer than words. 


It should look like this with all layers in place. Make sure all is smooth and serge together the two bottom edges of the Under and Upper Pocket Linings. Once done, smooth and press it all flat and pin into place. 

Serged bottom edge and pinned as above.


Your pocket and tummy stay are complete and ready now for the fly zipper to be installed! My favorite method is that of Sandra Betzina which you can find on the Threads website here.    My zip is all installed which I did tonight and tomorrow I hope to face the back of the pants. I will do my own thing there which means doing a two part waistband that separates at the center back, the better to fit my backside! First, though, I have to watch that rivet tute on You Tube if I can find it

This is not the most glamorous tutorial out there but it is one that I think can give you a lot of service through your pants making journey. I will put it up on the tutorial page for future reference. Let me know if you have any questions or need help...... ...........Bunny

Had to Refurbish This One!

    About  6 or 7 years ago , during the dawn of the Zipper Trend,  I bought one of my rare retail items. It was a blush pink and black bord...